Home Assistant dashboard: Date & Time

Here you find Home Assistant (lovelace) dashboard examples related to date and time which you can easily add to your own dashboards.
Table of Contents
- Time and date
- Inline time and date (Dutch format)
- Date in Dutch format
- Current day of the week (Dutch format)
- Days count down
- How long an entity is active in human-readable text
- Hours count up
- Last changed indication as secondary info
- Last changed indication
- Triggered today
- Time selector on the dashboard
Time and date
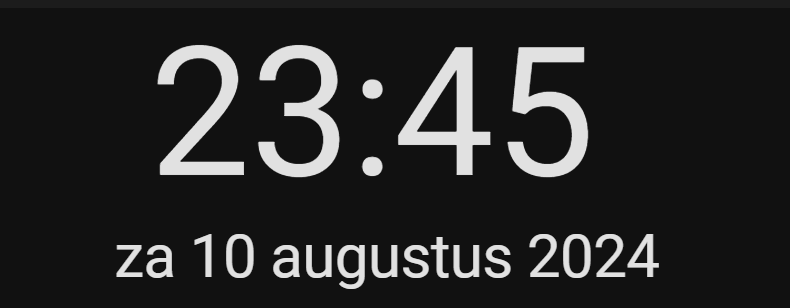
Huge time notation and a full date notation.
For the date a template is used, sensor.date_only_formatted
# Source code by vdbrink.github.io
# Mushroom title cards with a large time and date
# configuration.yaml
type: vertical-stack
cards:
  - type: custom:mushroom-title-card
    title: '{{now().strftime(''%H:%M'')}}'
    alignment: center
    card_mod:
      style: |
        ha-card {
          --title-font-size: 90px !important;
        }
  - type: custom:mushroom-title-card
    title: {{states('sensor.date_only_formatted')}}
    alignment: center
    card_mod:
      style: |
        ha-card {
          --title-font-size: 30px !important;
        }
Inline time and date (Dutch format)

The current time and full date in Dutch notation.
# Source code by vdbrink.github.io
# Template sensor with the current time and full date in Dutch
# For example "zo 4 januari 2026"
# configuration.yaml
template:
  - sensor:
      - name: "Tijd en datum"
        unique_id: time_date_formatted
        state: >-
          {% set days = ["maandag", "dinsdag", "woensdag", "donderdag", "vrijdag", "zaterdag", "zondag"] %}
          {% set day = days[now().weekday()] %}
          {% set day_short = day[0:2] %}
          {% set months = ["januari", "februari", "maart", "april", "mei", "juni", "juli", "augustus", "september", "oktober", "november", "december"] %}
          {% set month = months[now().month - 1] %}
          {{ now().strftime('%H:%M') ~ ', ' ~ day_short ~ ' ' ~ now().day ~ ' ' ~ month ~ ' ' ~ now().strftime('%Y') }}
        icon: mdi:calendar-clock
Now on the dashboard, this sensor can be used with this code:
# Source code by vdbrink.github.io
# Entity card which shows the time and date sensor without a name
# Dashboard card code
- type: entity
  entity: sensor.time_date_formatted
  name: ' '
Date in Dutch format
The date formatted like this: zo 4 januari 2026.
NOTE: If you replace
day_shortin the last template line fordaythe value will bezondag 4 januari 2026.
# Source code by vdbrink.github.io
# Template sensor with the date in Dutch format
# For example "zo 4 januari 2026"
# configuration.yaml
template:
  - sensor:
      - name: "Datum"
        unique_id: date_only_formatted
        state: >-
          {% set days = ["maandag", "dinsdag", "woensdag", "donderdag", "vrijdag", "zaterdag", "zondag"] %}
          {% set day = days[now().weekday()] %}
          {% set day_short = day[0:2] %}
          {% set months = ["januari", "februari", "maart", "april", "mei", "juni", "juli", "augustus", "september", "oktober", "november", "december"] %}
          {% set month = months[now().month - 1] %}
          {{ day_short ~ ' ' ~ now().day ~ ' ' ~ month ~ ' ' ~ now().strftime('%Y') }}
        icon: mdi:calendar-clock
Current day of the week (Dutch format)

Current day of the week in Dutch.
# Source code by vdbrink.github.io
# Template sensor with the current day of the week in Dutch
# configuration.yaml
template:
  - sensor:
      - name: "Dag van de week"
        unique_id: day_of_the_week_full
        state: >-
          {% set days = ["maandag", "dinsdag", "woensdag", "donderdag", "vrijdag", "zaterdag", "zondag"] %}
          {% set day = days[now().weekday()] %}
          {{ day }}
Days count down

Create a new countdown sensor based on an existing date sensor.
Twente Milieu: format YYYY-MM-DD
Countdown for the number of days until they pick up the paper waste.
For example, the Twente Milieu integration creates the sensor paper_waste_pickup in the format YYYY-MM-DD
With this template it gives the number of days from now.
# Source code by vdbrink.github.io
# Template sensor with the number of days until the next paper waste pickup
# configuration.yaml
template:
  - sensor:
      - name: "Paper waste pickup countdown"
        unique_id: paper_waste_pickup_countdown
        state: >-
           {% set now_timestamp = as_timestamp(strptime(states("sensor.date"), "%Y-%m-%d")) %}
           {% set paper_timestamp = as_timestamp(strptime(states("sensor.paper_waste_pickup"), "%Y-%m-%d")) %}
           {% set days = ((paper_timestamp - now_timestamp) / (24 * 60 * 60)) | round(0, 'ceil')  %}
           {{ days }}
        icon: mdi:delete-empty
        unit_of_measurement: "dagen"
HACS: Afvalbeheer: attribute and format YYYYMMDD
Countdown for the number of days until they pick up the paper waste.
The HACS: Afvalbeheer integration creates the sensor wastecollector_papier, the default value can be Morgen, 05-02-2024 or 06-02-2024. But the attributes field Sort_date has a default YYYYMMDD, that’s why I use this value.
With this template it gives the number of days from now.
# Source code by vdbrink.github.io
# Template sensor with the days until the next paper waste pickup
# configuration.yaml
template:
  - sensor:
      - name: "Paper waste pickup countdown"
        unique_id: paper_waste_pickup_countdown
        state: >-
          {% set datex = state_attr('sensor.wastecollector_papier','Sort_date') | string %}
          {{ ((as_timestamp(strptime(datex, '%Y%m%d')) - as_timestamp(now())) / (60 * 60 * 24)) | round(0, 'ceil')  }}
        icon: mdi:delete-empty
        unit_of_measurement: "dagen"
Show only on the last 4 days
To show only the message when it’s less than 4 days before the pick-up I used the HACS: auto-entities custom element.
Install this integration, via this button, into your own Home Assistant instance.

# Source code by vdbrink.github.io
# Auto-entities card which only shows the paper waste pickup countdown
# Dashboard card code
- type: custom:auto-entities
  card:
    type: entities
  filter:
    include:
      - entity_id: sensor.paper_waste_pickup_countdown
        state 1: "< 4"
        state 2: "> -1"
  show_empty: false
How long an entity is active in human-readable text


Show in human-readable text how long an entity, like a washing machine, is active.
I used a custom HACS module mushroom.
Install this integration, via this button, into your own Home Assistant instance.
# Source code by vdbrink.github.io
# Entities card title which shows how long the washing machine has been running
# Dashboard card code
- type: custom:mushroom-title-card
  title: |-
  {{ 'De wasmachine is ' }}
  {%- set entity_id = 'binary_sensor.wasmachine' -%}
  {%- if is_state(entity_id, 'on') -%}

      {%- set runningsince = (now()) - ((states[entity_id].last_changed)) -%}
      {%- set runningsinceseconds = runningsince.total_seconds()|round -%}
      {%- set runningsincedays = (runningsinceseconds / 86400)|int|string -%}
      {%- set runningsincedaystext = 'dagen' -%}
      {%- if runningsincedays|int == 1 -%}
        {%- set runningsincedaystext = 'dag' -%}
      {%- endif -%}

      {%- set runningsincehours = (runningsinceseconds % 86400 / 3600)|int|string -%}
      {%- set runningsincehourstext = 'uren' -%}
      {%- if runningsincehours|int == 1 -%}
        {%- set runningsincehourstext = 'uur' -%}
      {%- endif -%}

      {%- set runningsinceminutes = (runningsinceseconds % 3600 / 60)|int|string -%}
      {%- set runningsinceminutestext = 'minuten' -%}
      {%- if runningsinceminutes|int == 1 -%}
        {%- set runningsinceminutestext = 'minuut' -%}
      {%- endif -%}

      {%- if runningsincedays|int > 0 -%}
      # Running more then 1 day
        {{ runningsincedays + ' ' + runningsincedaystext + ', ' + runningsincehours + ' ' + runningsincehourstext + ' en ' + runningsinceminutes + ' ' + runningsinceminutestext }}
      {%- elif runningsincehours|int > 0 -%}
      # Running more then 1 hour
        {{ runningsincehours + ' ' + runningsincehourstext + ' en ' + runningsinceminutes + ' ' + runningsinceminutestext }}
      {%- else -%}
      # Running for minutes
        {{ runningsinceminutes + ' ' + runningsinceminutestext }}
      {%- endif -%}
      {%- if is_state(entity_id, 'on') -%}
        {{ ' bezig'}}
      {%- endif -%}
  {%- else -%}
  # State is off
    {{ ' uit' }}
  {%- endif -%}
Hours count up

Count the hours since the last changed state. In this case when a drawer with medicines was opened for the last time.
The value 11.3 will round to 11 and also 11.6 will round to 11 hours.
# Source code by vdbrink.github.io
# Template sensor with the number of hours ago the drawer was opened
# configuration.yaml
template:
  - sensor:
      - name: "Drawer opened hours ago"
        unique_id: drawer_opened_hours_ago
        state: >-
          {% set now_timestamp = as_timestamp(now()) %}
          {% set drawer_timestamp = as_timestamp(states.binary_sensor.drawer_contact.last_changed) %}
          {% set hours = ((now_timestamp - drawer_timestamp) / (60 * 60)) | round(0, 'ceil')  %}
          {{ hours }}
        unit_of_measurement: "uren"
Last changed indication as secondary info

Show the time when a sensor was triggered the last time and, the value on the right is the actual sensor value.
# Source code by vdbrink.github.io
# Entities card which shows a contact sensor with the time since it last changed (secondary info)
# Dashboard card code
- type: entities
  entities:
    - entity: binary_sensor.contact1_contact
      secondary_info: last-changed
Last changed indication
A custom sensor that shows the time since the last change.
Also useful to show on a floor map.
# Source code by vdbrink.github.io
# Template sensor with the relative time since the mailbox contact last changed
# Dashboard card code
template:
  - sensor:
      - name: "Mailbox timer"
        unique_id: mailbox_timer
        icon: mdi:clock-outline
        state: >
          {{ relative_time(states.binary_sensor.mailbox_contact.last_changed) }}
Triggered today
Test if the robot vacuum has already run today.
# Source code by vdbrink.github.io
# Template binary sensor which is on when the robot vacuum has already cleaned today
# configuration.yaml
template:
  - binary_sensor:
      - name: "Vacuum run today"
        unique_id: vaccuum_run_today
        state: "{{ as_local(as_datetime(states('sensor.vacuum_last_clean_start'))).date() == now().date() }}"
Time selector on the dashboard
I have a LED strip and want users to define the ON/OFF time by themselves, via the dashboard. If and when it should be triggered ON and OFF.
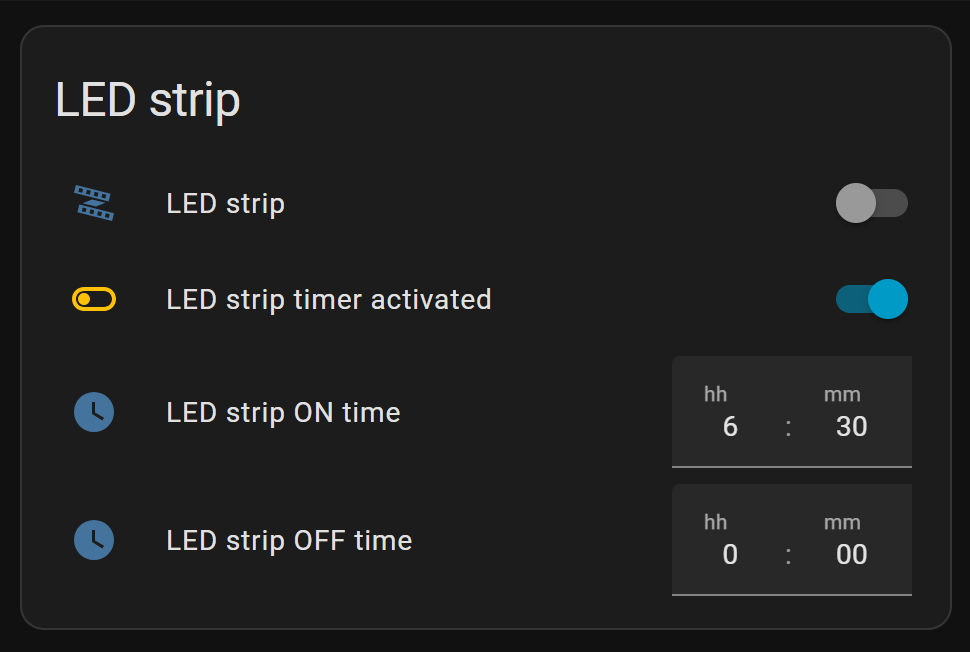
See the dedicated page Home Assistant dashboard: Wake-up alarm light how to set this up.
As an alternative, you can use the advanced HACS scheduler integration to define timers.
« See also my other Home Assistant tips and tricks
^^ Top | Homepage | Best Buy Tips | Automation Ideas | Blog posts | Sitemap