Home Assistant dashboard: Mealie Recipe Manager
![]()

Here you can find how I seamlessly integrated the recipe manager Mealie into my HA dashboard to organize my recipes and show a meal day- and weekplanning.
This documentation is based on Mealie version 3.3.0 (september 2025)
And still works with Mealie 3.13.1 and Home Assistant 2026.3.3 (March 2026).
UPDATE 07-2024: There is now also a Mealie integration in Home Assistant.
This page was already created before this existed; here I also describe other functionalities beyond what you get with this integration.
Table of Contents
- Introduction
- Functionalities
- Installation
- Add recipes
- Dashboard integration
- Integrate Mealie data into your dashboard
- Out of the freezer the evening before
- Bookmark for direct import
- Ollama integration
- FAQ
Introduction
How do you manage your recipes? Via bookmarks in your browser, only to end up with dead links to great recipes? Or as printed versions with notes of your own improvements?
As a Home Assistant enthusiast, I wanted to store my recipes locally on my home server to use while preparing meals,
and also show my day- and week meal planning on the HA kitchen dashboard.
I searched for a self-hosting solution and found Mealie most suitable for this purpose.
With Mealie, it’s possible to add recipes manually, but also import them via an online URL directly into the Mealie structure. If you have a YouTube video, you can add it in the description as a reference to your online recipe. This way I have all my recipes centralized in one place!

For more project information, check their website: https://docs.mealie.io/
Functionalities
The program I was looking for had to contain the following functionality:
- Organize my recipes
- Create a meal week planning
- Show a photo of today’s meal
- Self-hosting
- API to show my week planning in a Home Assistant dashboard
Mealie is the open source tool that provides all these functionalities and is active in development.
As a recipe manager, it contains a lot of smart options, like:
- Make use of sections in your recipe
- Link ingredients to single steps
- Hide steps which are finished during the cooking process
- Check a checkbox for each ingredient you already got on the table
- Split ingredients by amount, type and product
- Add ingredients to a shopping list
- Add extra photos to single steps
- Add extra assets (PDFs, notes, photos) to a recipe
- And many, many more…
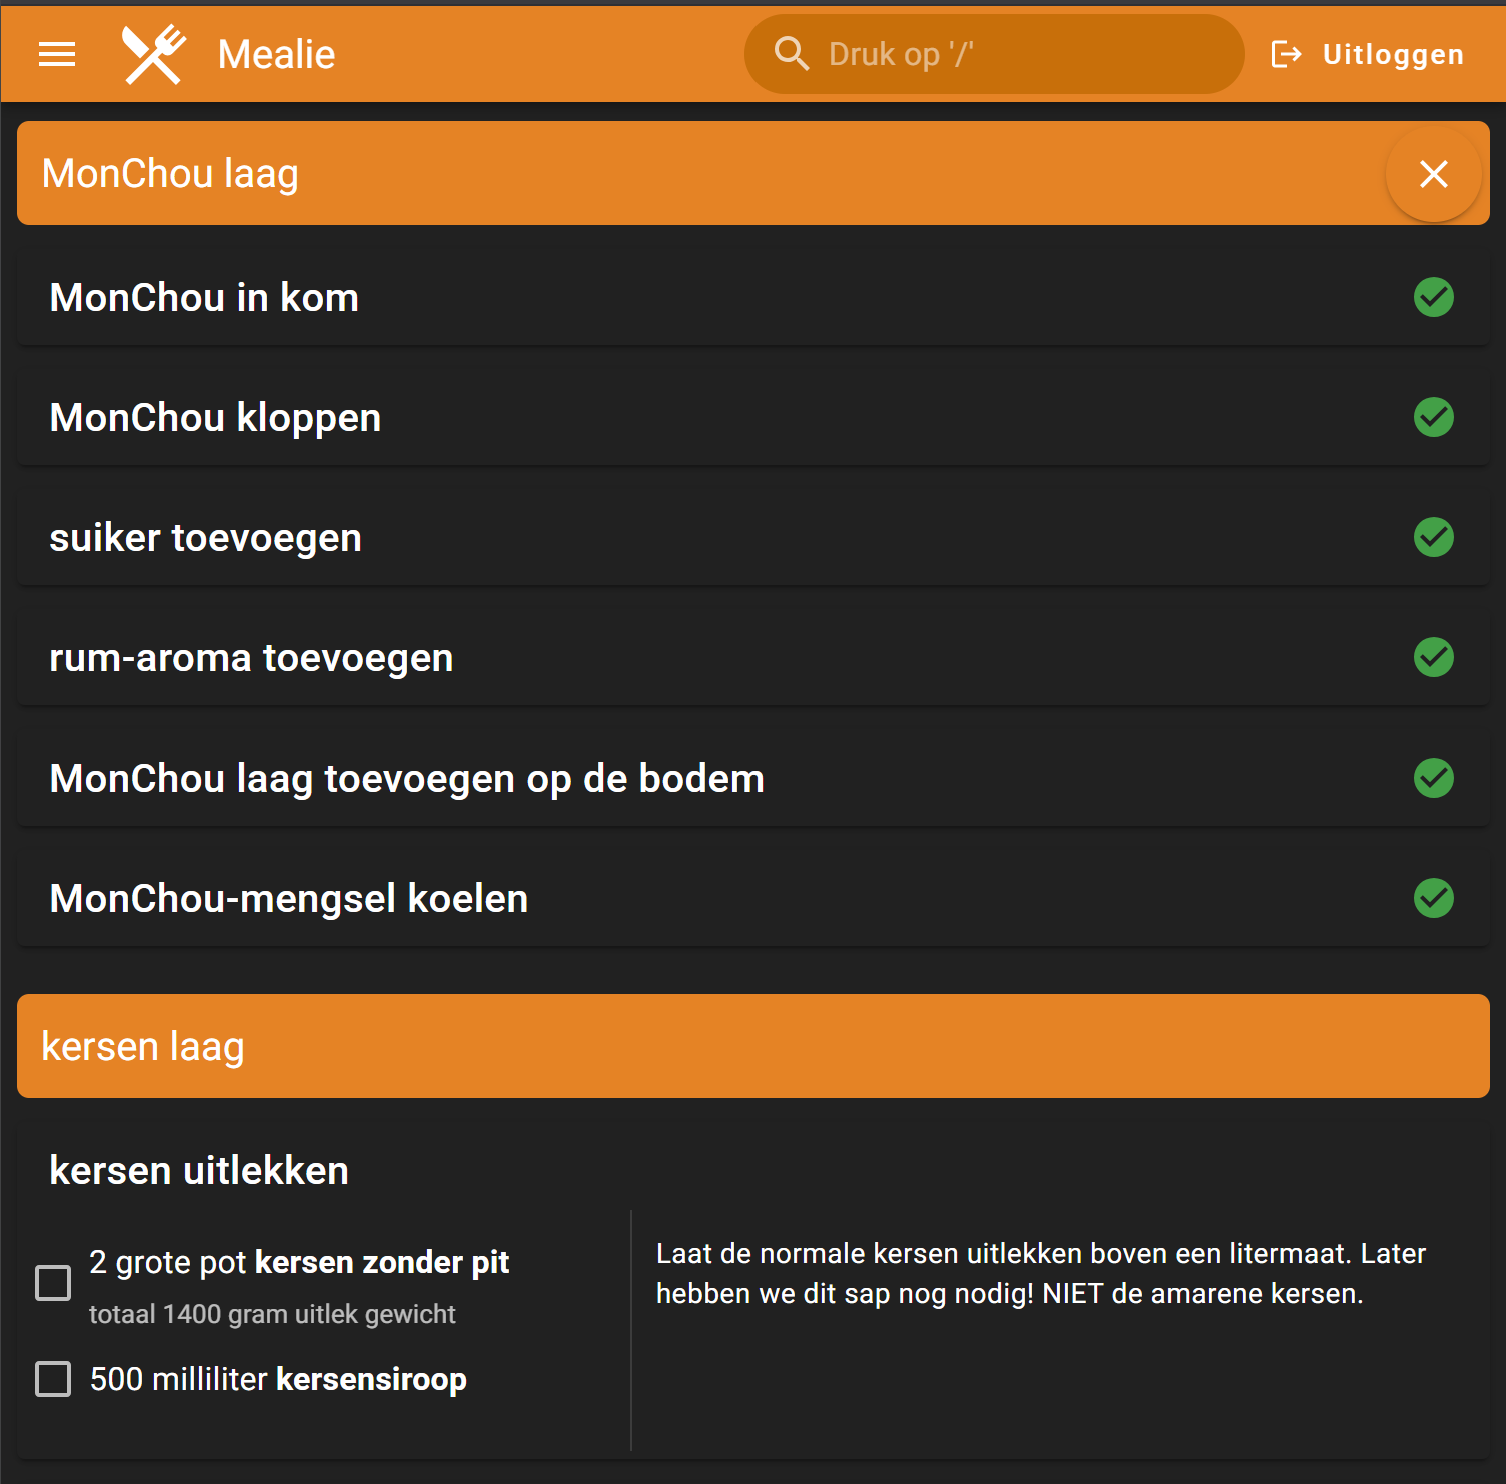
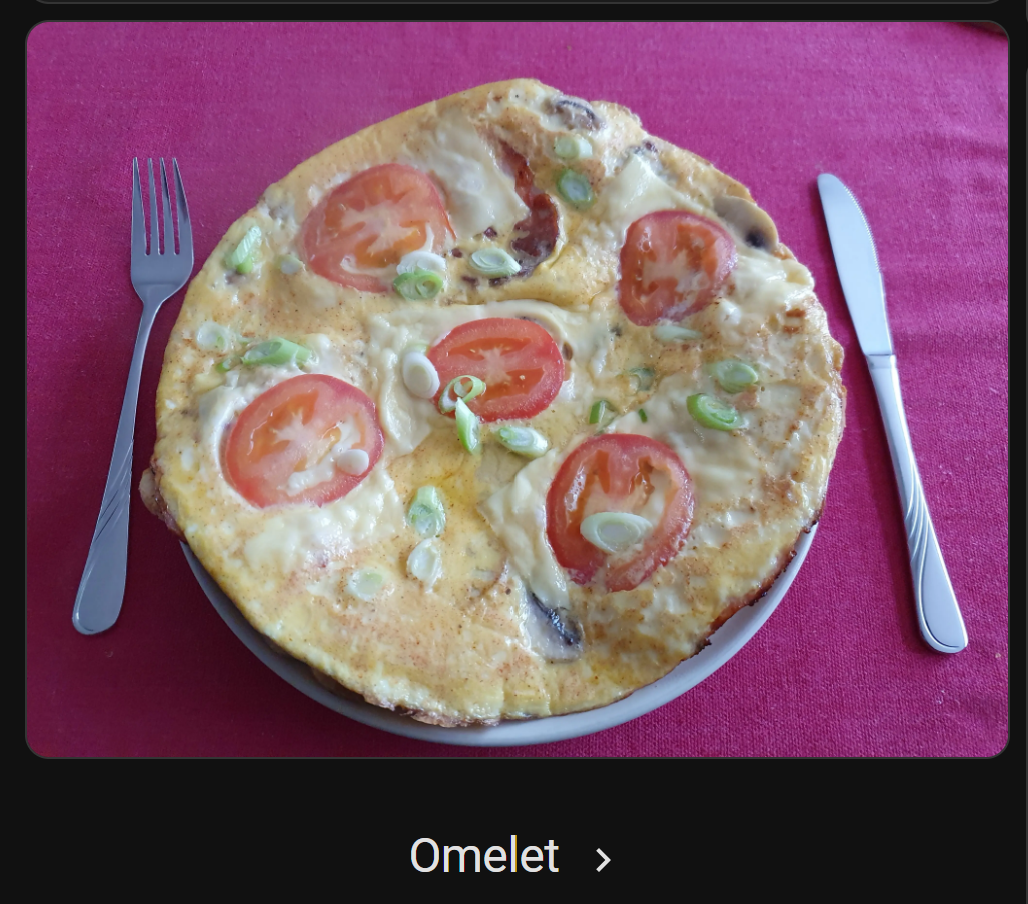
This is an example of one of my recipes in Cook-mode:
Installation
Docker
Mealie can run as a single Docker container.
The website and API (available under /docs) will be available on the server via the url http://< ip-adress >:9925
# Sourcecode by vdbrink.github.io
# docker-compose.yaml
services:

  mealie-recipes:
    container_name: mealie-recipes
    # This documentation is based on version 3.3.0 (september 2025)
    image: ghcr.io/mealie-recipes/mealie:latest
    restart: always
    volumes:
      - ./volumes/mealie-recipes:/app/data/
    ports:
      - "9925:9000"
    environment:
      PUID: 1000
      PGID: 1000
      TZ: Europe/Amsterdam

      TOKEN_TIME: 87600 # 10 years
Hass.io Add-on
It can also be installed as a Hass.io Add-on directly in Home Assistant.
Check this page for the installation details https://github.com/alexbelgium/hassio-addons/tree/master/mealie#installation
Smart Home Junkie created a step-by-step video about the installation in HA.

Add recipes
When you access your local Mealie website, you’re in read-only mode. Click in the top right corner to log in with the default credentials changeme@email.com / MyPassword
Click the plus button in the left menu to add meals manually or import them from a website. Not all recipe websites provide their data in a way that Mealie can fully import, so sometimes you need to copy-paste the recipe yourself.
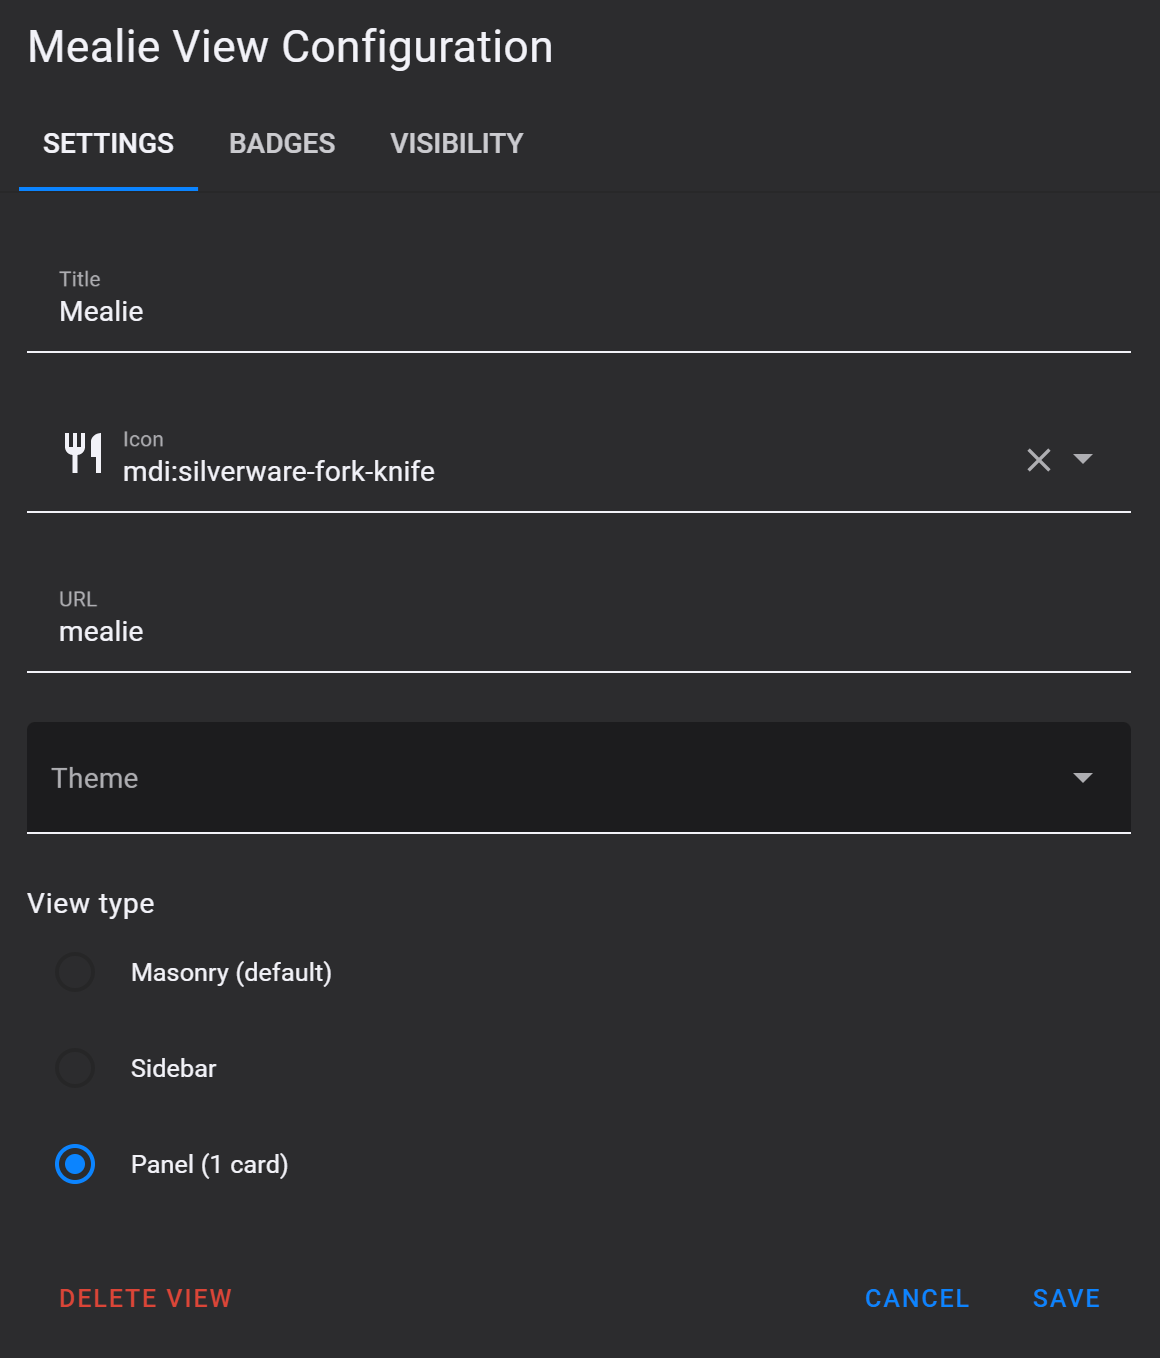
Dashboard integration
As Panel
To integrate Mealie as view in Home Assistant, create a new dashboard and use these settings:
On the dashboard, add only an iframe card and use these settings:
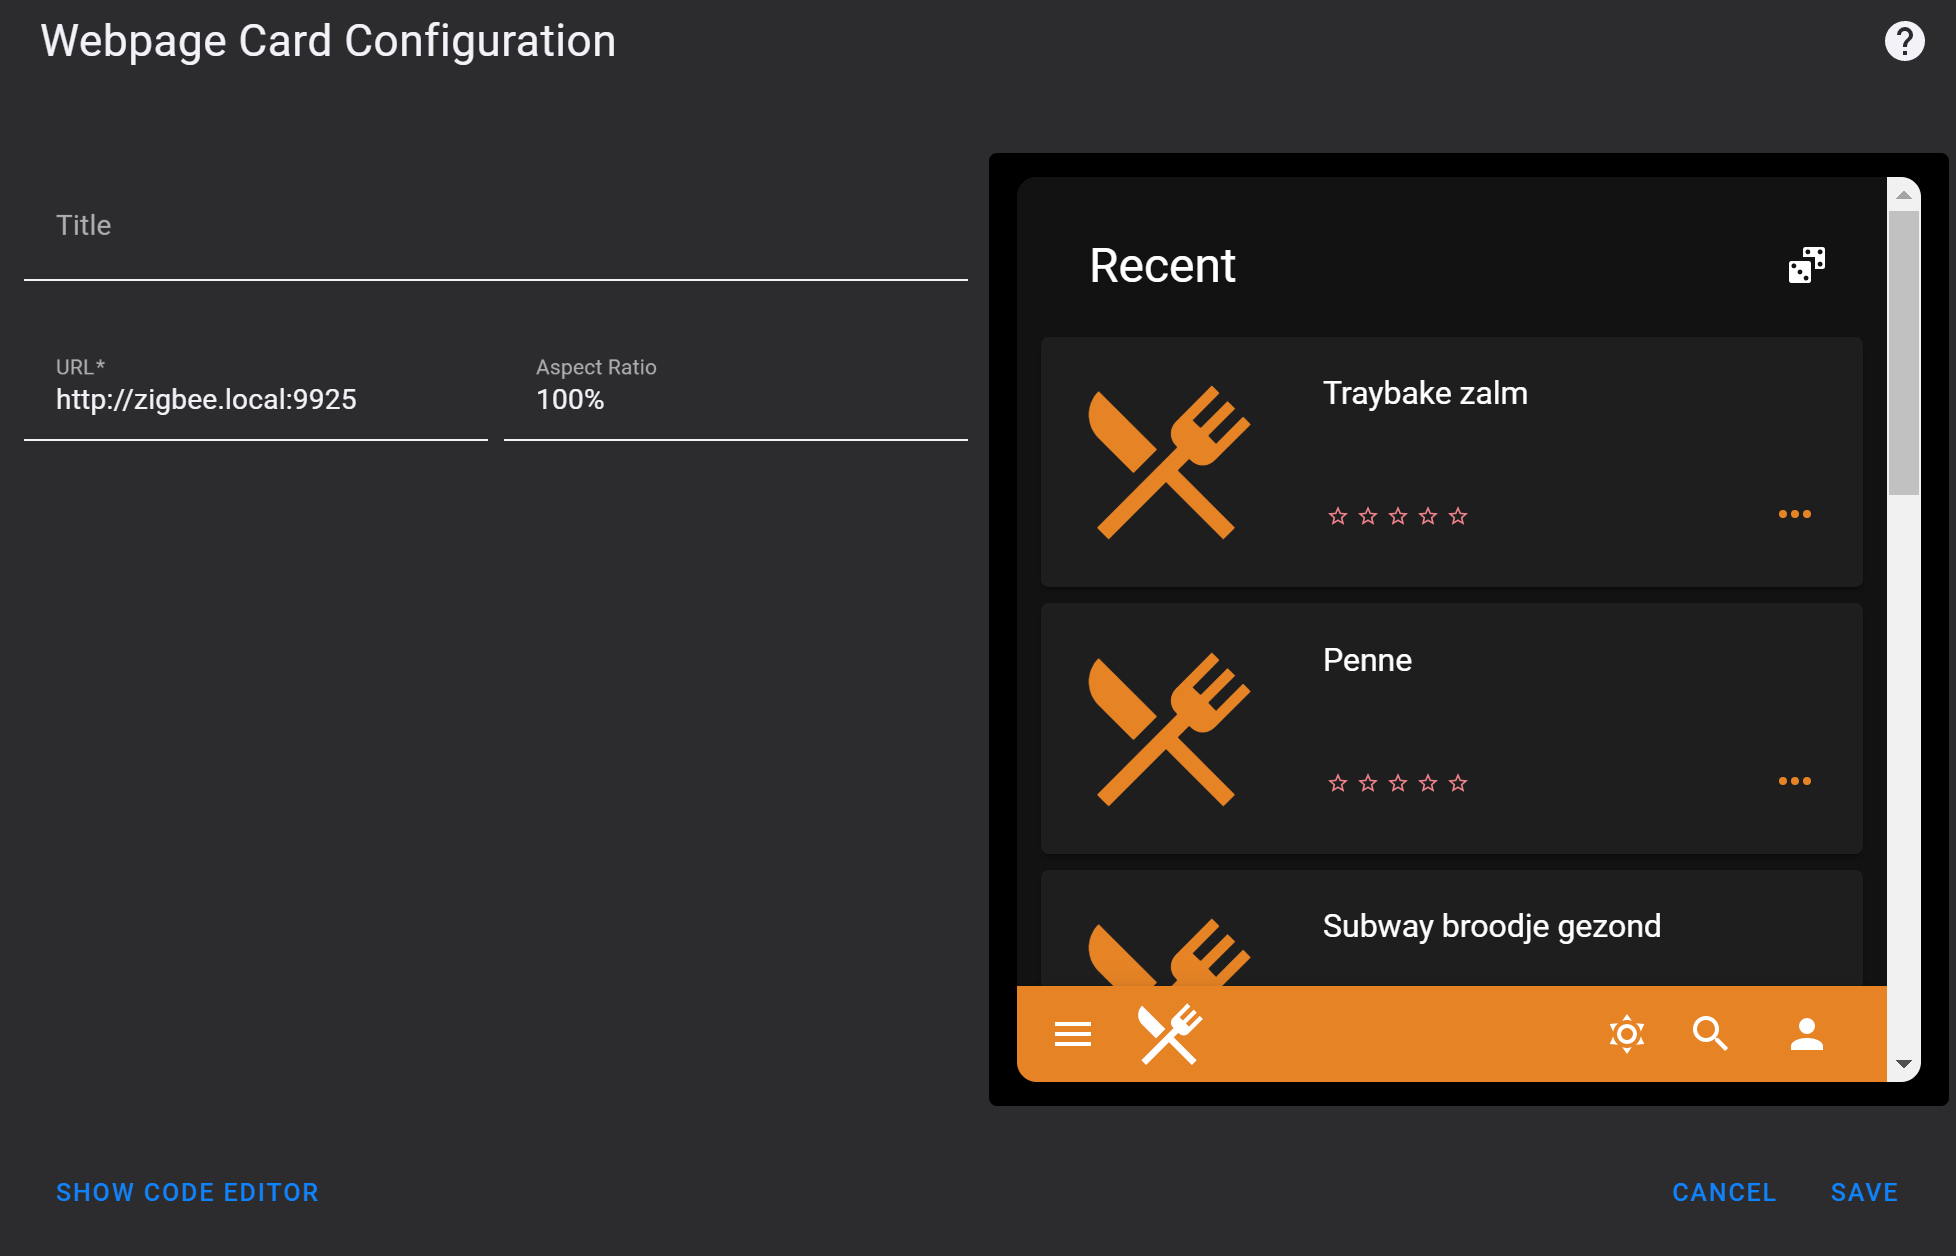
This is how it looks, integrated in Home Assistant.
As sidebar link
[update] This can be removed in newer HA versions.
Another option is to add a link to Mealie in the sidebar.

You only need to add this code to your configuration.yaml file.
# Sourcecode by vdbrink.github.io
# configuration.yaml
panel_iframe:
  mealie:
    title: Mealie
    url: "http://<ip-address>:9925"
    icon: mdi:silverware-fork-knife
Integrate Mealie data into your dashboard
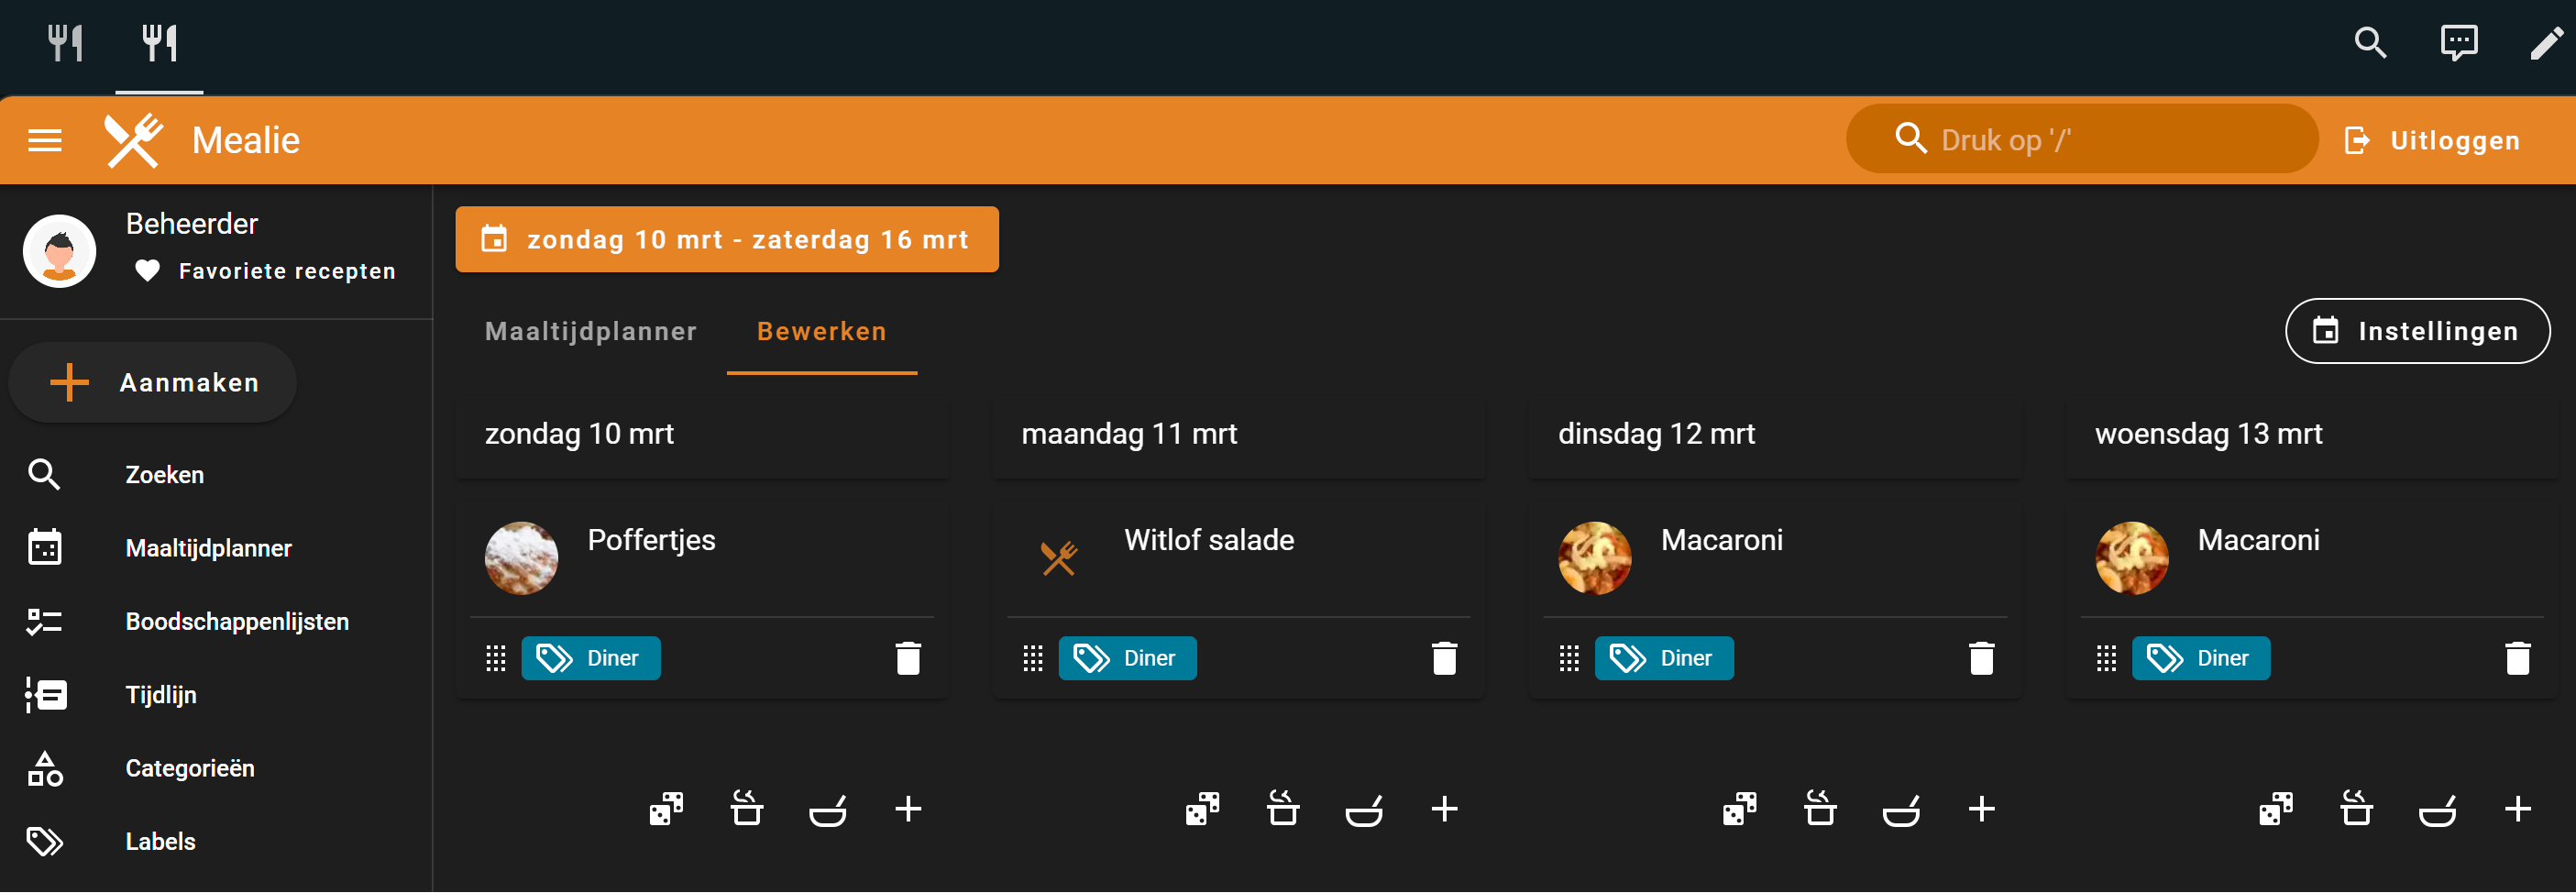
To use the functionality to show a day- and week planning, integrated in HA, you need to create first a meal plan.
In the side menu, choose the Meal planner option and use the top Edit menu item to start editing the planning. Use the + icon to select a meal for each day.
Today’s meal
Now that a week planning is made, we can use this data.
All data inside Mealie is also accessible through API calls.
Go to http://< ip-adress >:9925/docs to see all the available API’s.
To show it like this, the data must be stored in HA and then presented in a nice way.
Store today’s meal data as a sensor
First, a scraper is needed to get the data from the Mealie API and store it as a sensor in Home Assistant.
This code creates a sensor mealie_todays_meal with the state like Poffertjes. This meal id is needed to grab the corresponding photo.
To call the API, you need a secret Bearer token. Check the FAQ how to create one.
If you don’t want to use the secrets.yaml method, you can also place the token in this config itself.
Authorization: Bearer ey....
# Sourcecode by vdbrink.github.io
# configuration.yaml
rest:
 - scan_interval: 3600
   resource: "http://< mealie-url >:9925/api/households/mealplans/today"
   headers:
     Authorization: !secret mealie_bearer
   sensor:
     - name: "Mealie todays meal ID"
       value_template: "{{ value_json[0].recipe.id }}"
       force_update: true
     - name: "Mealie todays meal"
       value_template: "{{ value_json[0].recipe.name }}"
       force_update: true
Create today’s meal image
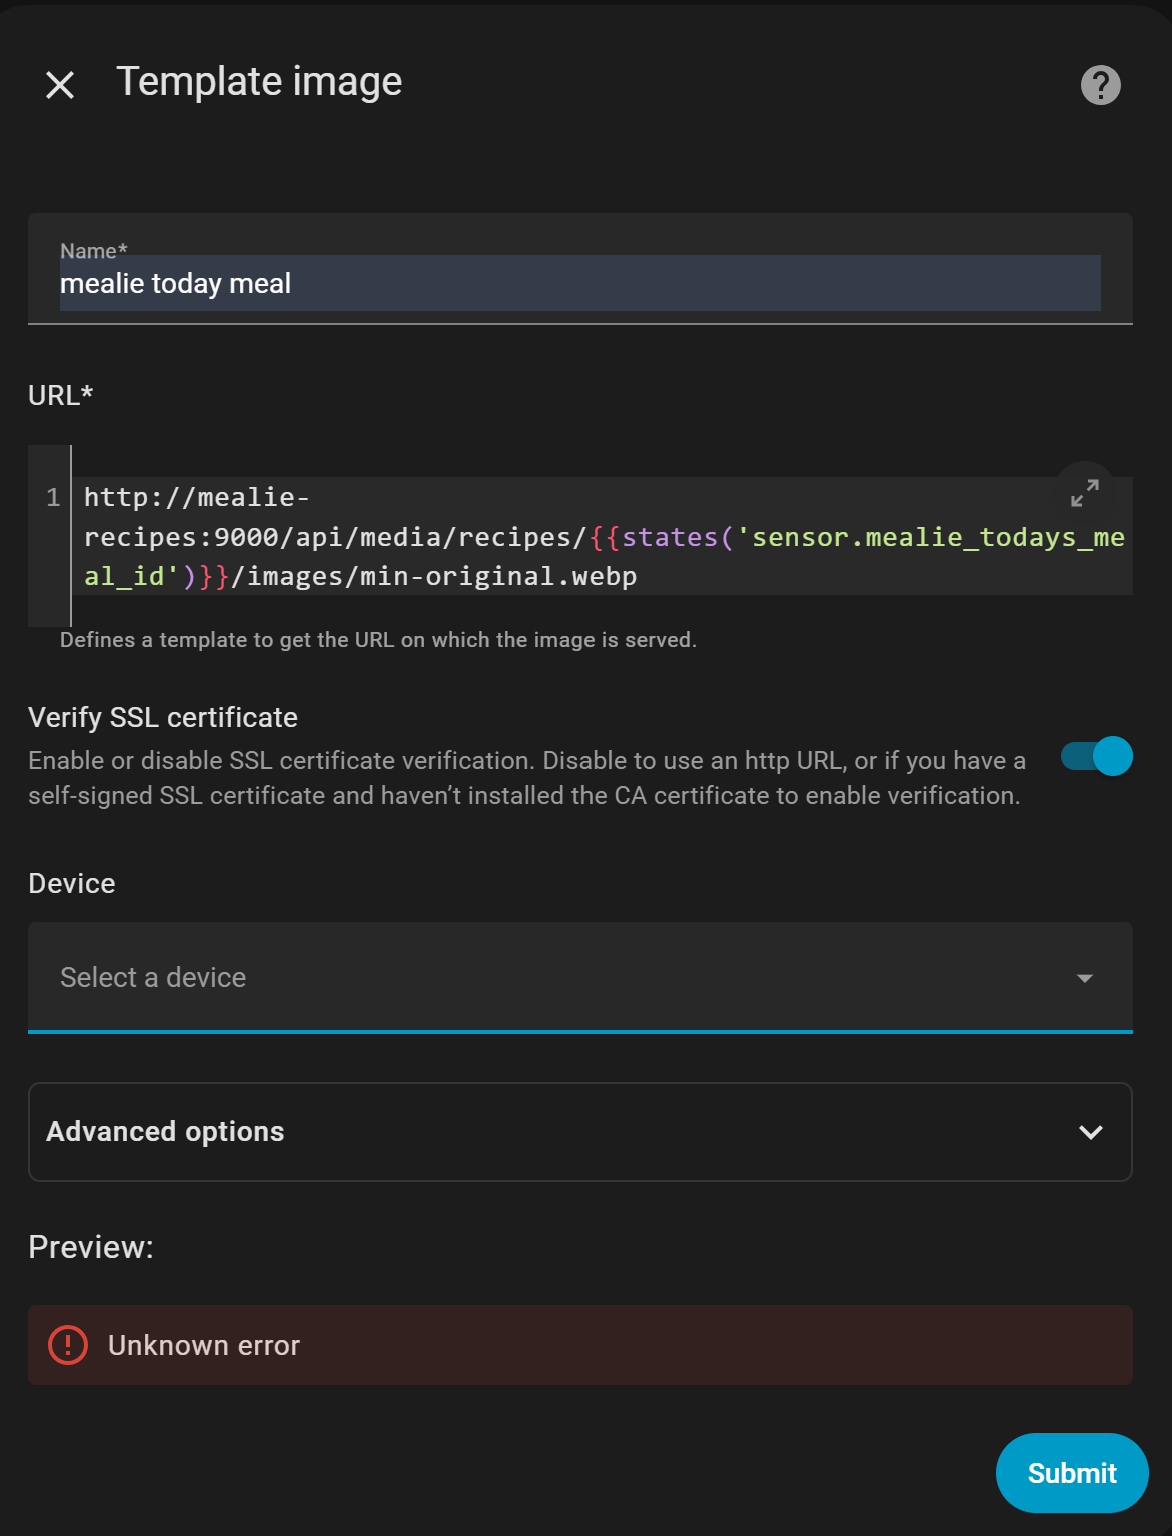
To create the image, we use a Mealie URL which provides the images based on the stored meal ID. To combine the dynamic meal ID with the URL we use a Helper template image.
To create this helper sensor:
Go to Home Assistant -> Devices & services -> Helpers -> Create Helper -> Template -> Image
Give it the name Mealie today meal and fill in the URL.
You can use the internal docker link:
http://mealie-recipes:9000/api/media/recipes/{{states('sensor.mealie_todays_meal_id')}}/images/min-original.webp
or the outside host url (replace < ip-address > with your own server ip-address or the internal docker name, in my case mealie-recipes):
http://< ip-address >:9925/api/media/recipes/{{states('sensor.mealie_todays_meal_id')}}/images/min-original.webp
When you click on submit, you have a new sensor called, image.mealie_today_meal.
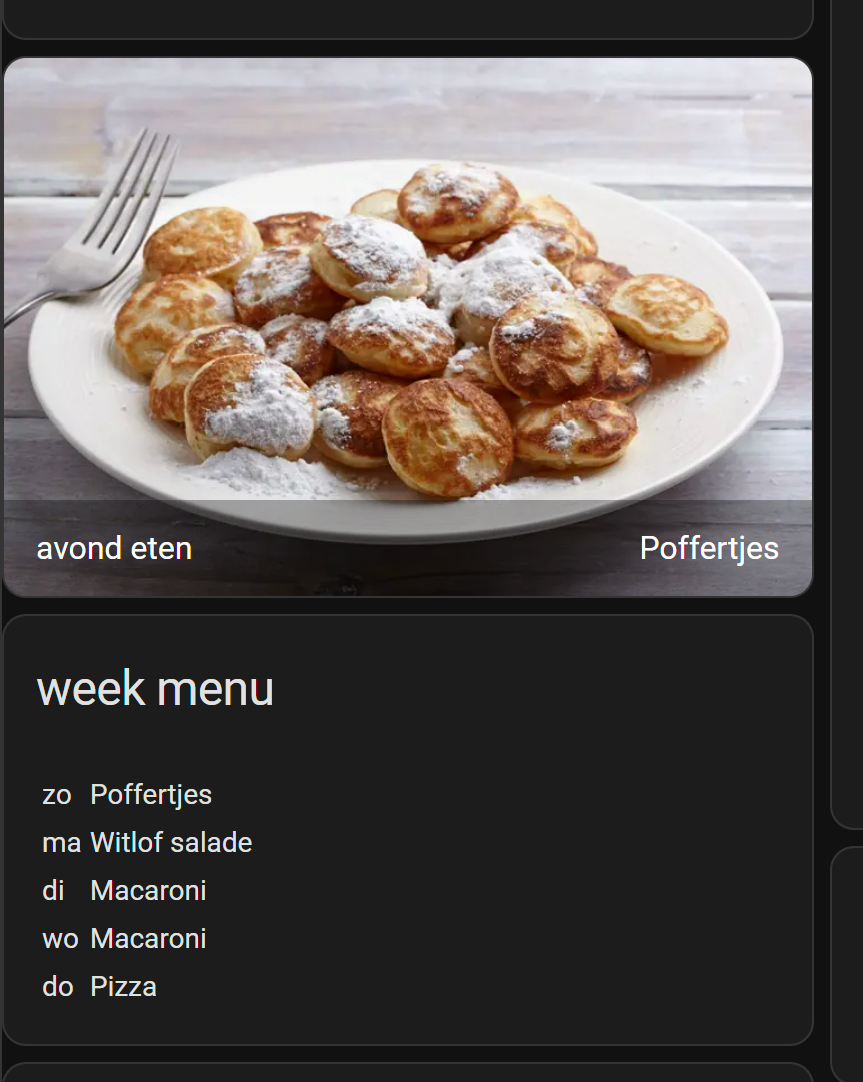
Card element
Now that we have stored the name of today’s meal and the corresponding image, we can add it to our HA as a card, like this:
Add a Picture element to the dashboard with this code:
# Sourcecode by vdbrink.github.io
# Dashboard card code
- type: vertical-stack
  cards:
    - type: picture
      image_entity: image.mealie_today_meal
      style: |
        ha-card > img {
        height: 100px !important;
        overflow: hidden;
        display: flex;
        }
    - type: custom:mushroom-title-card
      title: "{{states.sensor.mealie_todays_meal.state}}"
      alignment: center
      title_tap_action:
        action: navigate
        navigation_path: /lovelace-dashboard/mealie
I use the tap_action here too; when you click on the card you navigate directly to the Mealie integration iframe.
Meal planning for this week as a list
It’s possible to show the complete meal planning for the rest of the week as a list on your dashboard!
Store meal planning data as a sensors
First create a scraper sensor in configuration.yaml.
It will get the meal planning ordered by date and start with the meal for today.
Then it creates for the upcoming 7 days, for each day two sensors, one with the name of the meal and the other one with the corresponding date (in the format YYYY-MM-DD).
Every day each meal moves one place up. At the end of the week, only the first sensor contains a value.
The update interval is set here to one hour, if you reorder the meals in Mealie it will reflect within this hour on your dashboard also.

# Sourcecode by vdbrink.github.io
# configuration.yaml
rest:
 - scan_interval: 3600
   resource: "http://< ip-address >:9925/api/households/mealplans?orderBy=date&orderDirection=asc"
   headers:
     Authorization: !secret mealie_bearer
   params:
     start_date: >
      {{ now().strftime('%Y-%m-%d') }}
   sensor:
     - name: "Mealie day0 name"
       value_template: "{{ value_json['items'][0].recipe.name }}"
       force_update: true
     - name: "Mealie day0 date"
       value_template: "{{ value_json['items'][0].date }}"
       force_update: true
     - name: "Mealie day1 name"
       value_template: "{{ value_json['items'][1].recipe.name }}"
       force_update: true
     - name: "Mealie day1 date"
       value_template: "{{ value_json['items'][1].date }}"
       force_update: true
     - name: "Mealie day2 name"
       value_template: "{{ value_json['items'][2].recipe.name }}"
       force_update: true
     - name: "Mealie day2 date"
       value_template: "{{ value_json['items'][2].date }}"
       force_update: true
     - name: "Mealie day3 name"
       value_template: "{{ value_json['items'][3].recipe.name }}"
       force_update: true
     - name: "Mealie day3 date"
       value_template: "{{ value_json['items'][3].date }}"
       force_update: true
     - name: "Mealie day4 name"
       value_template: "{{ value_json['items'][4].recipe.name }}"
       force_update: true
     - name: "Mealie day4 date"
       value_template: "{{ value_json['items'][4].date }}"
       force_update: true
     - name: "Mealie day5 name"
       value_template: "{{ value_json['items'][5].recipe.name }}"
       force_update: true
     - name: "Mealie day5 date"
       value_template: "{{ value_json['items'][5].date }}"
       force_update: true
     - name: "Mealie day6 name"
       value_template: "{{ value_json['items'][6].recipe.name }}"
       force_update: true
     - name: "Mealie day6 date"
       value_template: "{{ value_json['items'][6].date }}"
       force_update: true
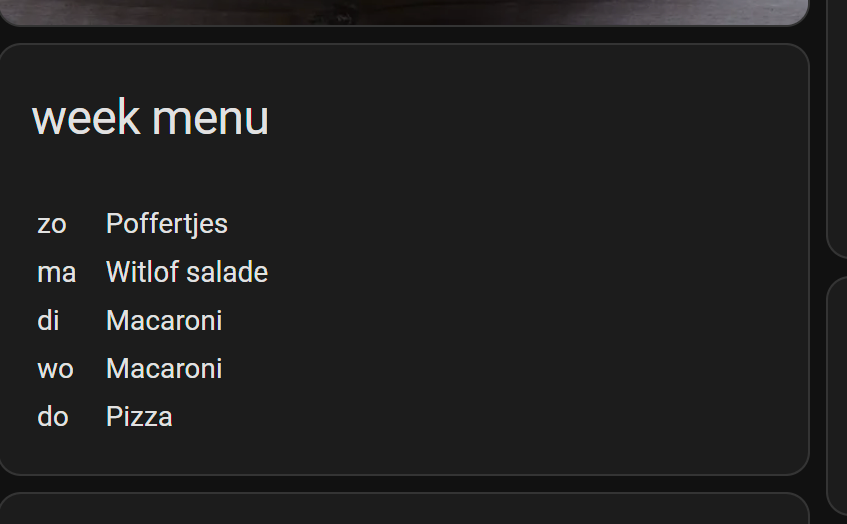
Markdown element
Now that we have stored the names of all the meals for the upcoming days, we can add them to our HA as a card, like this. During the week, the list will get shorter until you plan new meals for the upcoming days.
In your dashboard, add a Markdown card with this code.
Make sure you’re in the cards Code Editor mode (toggle mode with the blue text in the bottom of the dialog) when you paste this code.
The date will be formatted to the short notation for the day of the week.
# Sourcecode by vdbrink.github.io
# Dashboard card code
type: markdown
title: week menu
content: >-
<a href="/lovelace-dashboard/mealie">
<table> {% for i in range(8) %}
{% set index = i|string %}
{% set meal_date = states("sensor.mealie_day" + index + "_date") %}
{% set meal_name = states("sensor.mealie_day" + index + "_name") %}
{% if meal_date != 'unknown' %}
<tr>
<td>{{ ['ma','di','wo','do','vr','za','zo'][strptime(meal_date, "%Y-%m-%d").weekday()] }}
<td> </td>
</td>
<td>{{ meal_name }} </td>
</tr>
{% endif %}
{% endfor %}
</table></a>
card_mod:
style:
ha-markdown:
$: |
a {
all:unset;
color:white ! important;
cursor: pointer ! important;
}
> Click here to open the extended Markdown version with clickable text to go to your Mealie page >>
This extended version makes it possible to click on the menu text and go to the Mealie page.
Without the card_mod extension, which adds some CSS, you see all the text in blue and underlined.
Here is another HACS integration needed, card-mod, see https://github.com/thomasloven/lovelace-card-mod
Install this integration, via this button, into your own Home Assistant instance.\

# Sourcecode by vdbrink.github.io
# Dashboard card code
type: markdown
title: week menu
content: >-
<a href="/lovelace-dashboard/mealie">
<table>
{% for i in range(8) %}
{% set index = i|string %}
{% set meal_date = states("sensor.mealie_day" + index + "_date") %}
{% set meal_name = states("sensor.mealie_day" + index + "_name") %}
{% if meal_date != 'unknown' %}
<tr>
<td>
{{ ['ma','di','wo','do','vr','za','zo'][strptime(meal_date, "%Y-%m-%d").weekday()] }}
<td> </td>
<td>{{ meal_name }}</td>
</tr>
{% endif %}
{% endfor %}
</table>
</a>
card_mod:
style:
ha-markdown:
$: |
a {
all:unset;
color:white ! important;
cursor: pointer ! important;
}
Out of the freezer the evening before
I created a Node-RED automation that reminds me in the evening if I need to take meat/fish/anything else out of the freezer and move it to the refrigerator to slowly defrost overnight for tomorrow’s dinner.
This is based on the ingredient list, for the meal of tomorrow, if there is one of the ingredients which has the text [freezer] in it, I show the names of these ingredients in the notification.
Notification
This is an example of how such notification could look like:
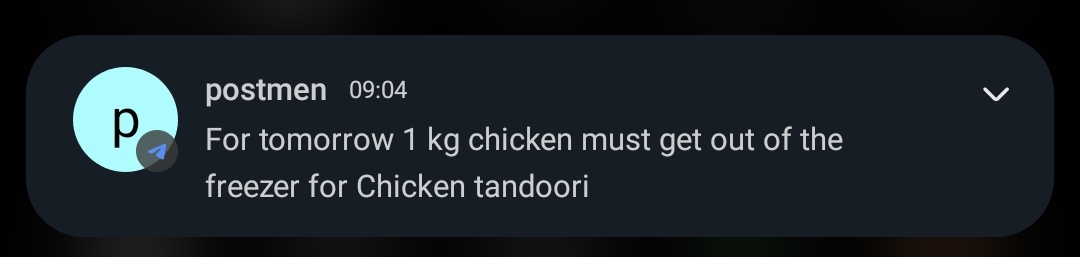
Other possible messages are:
- “For tomorrow no recipe is found.”
- “For tomorrow nothing need out of the freezer for {recipe_name}”
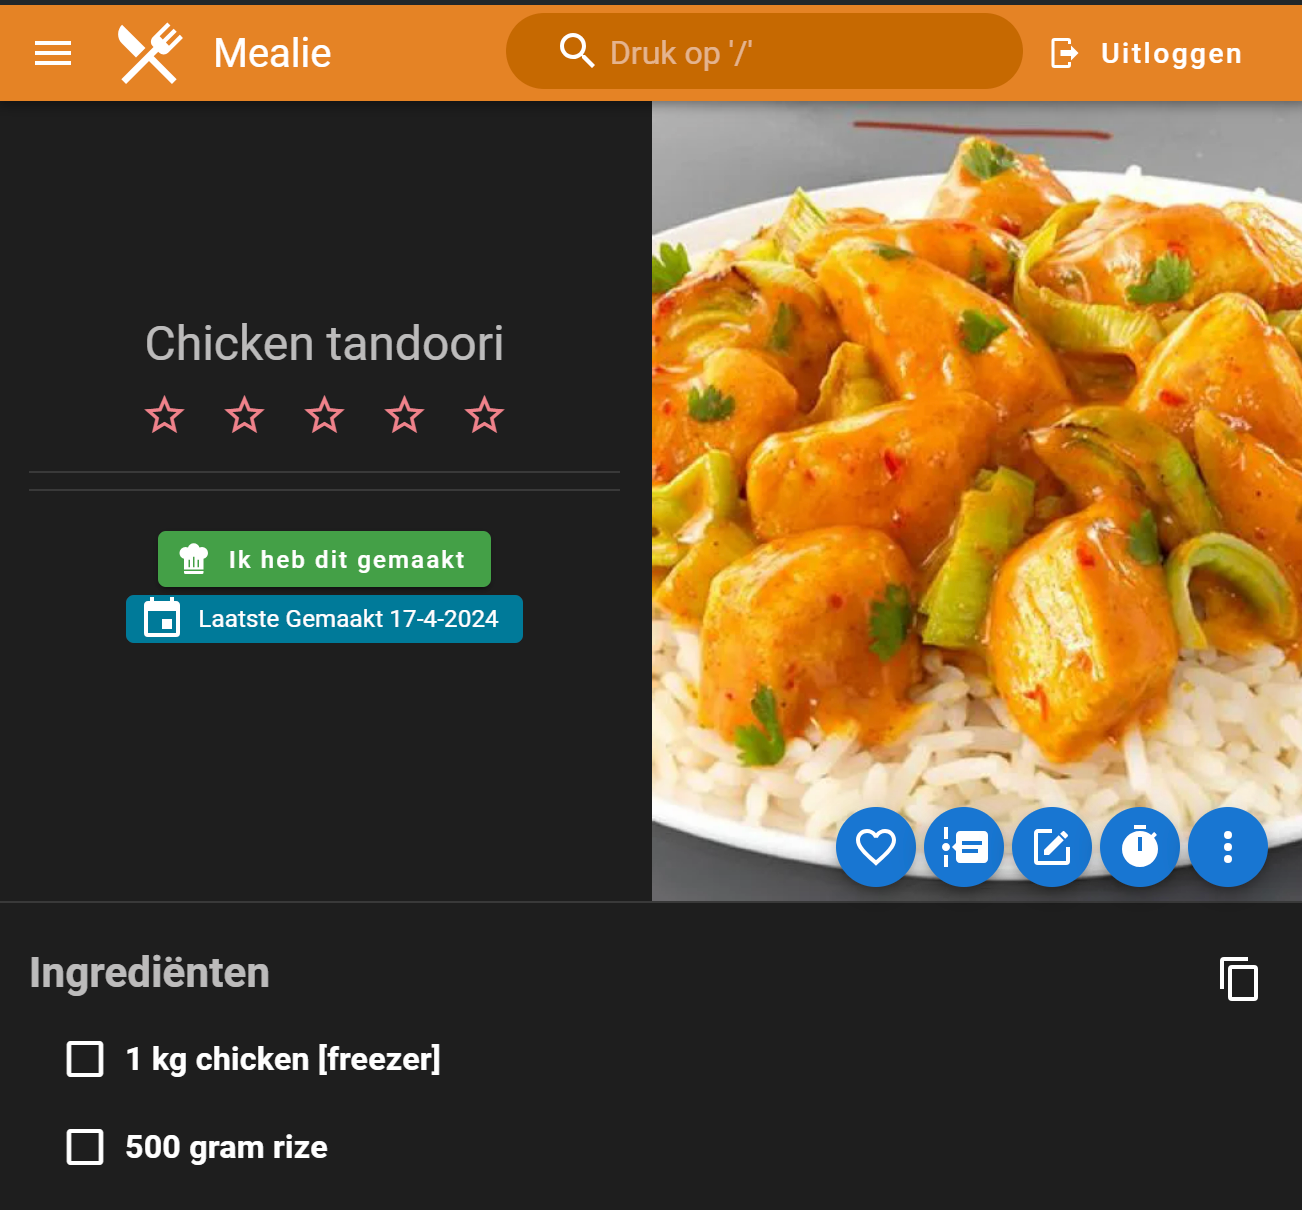
Tag an ingredient
Only ingredients with the text [freezer] are used in the notification.
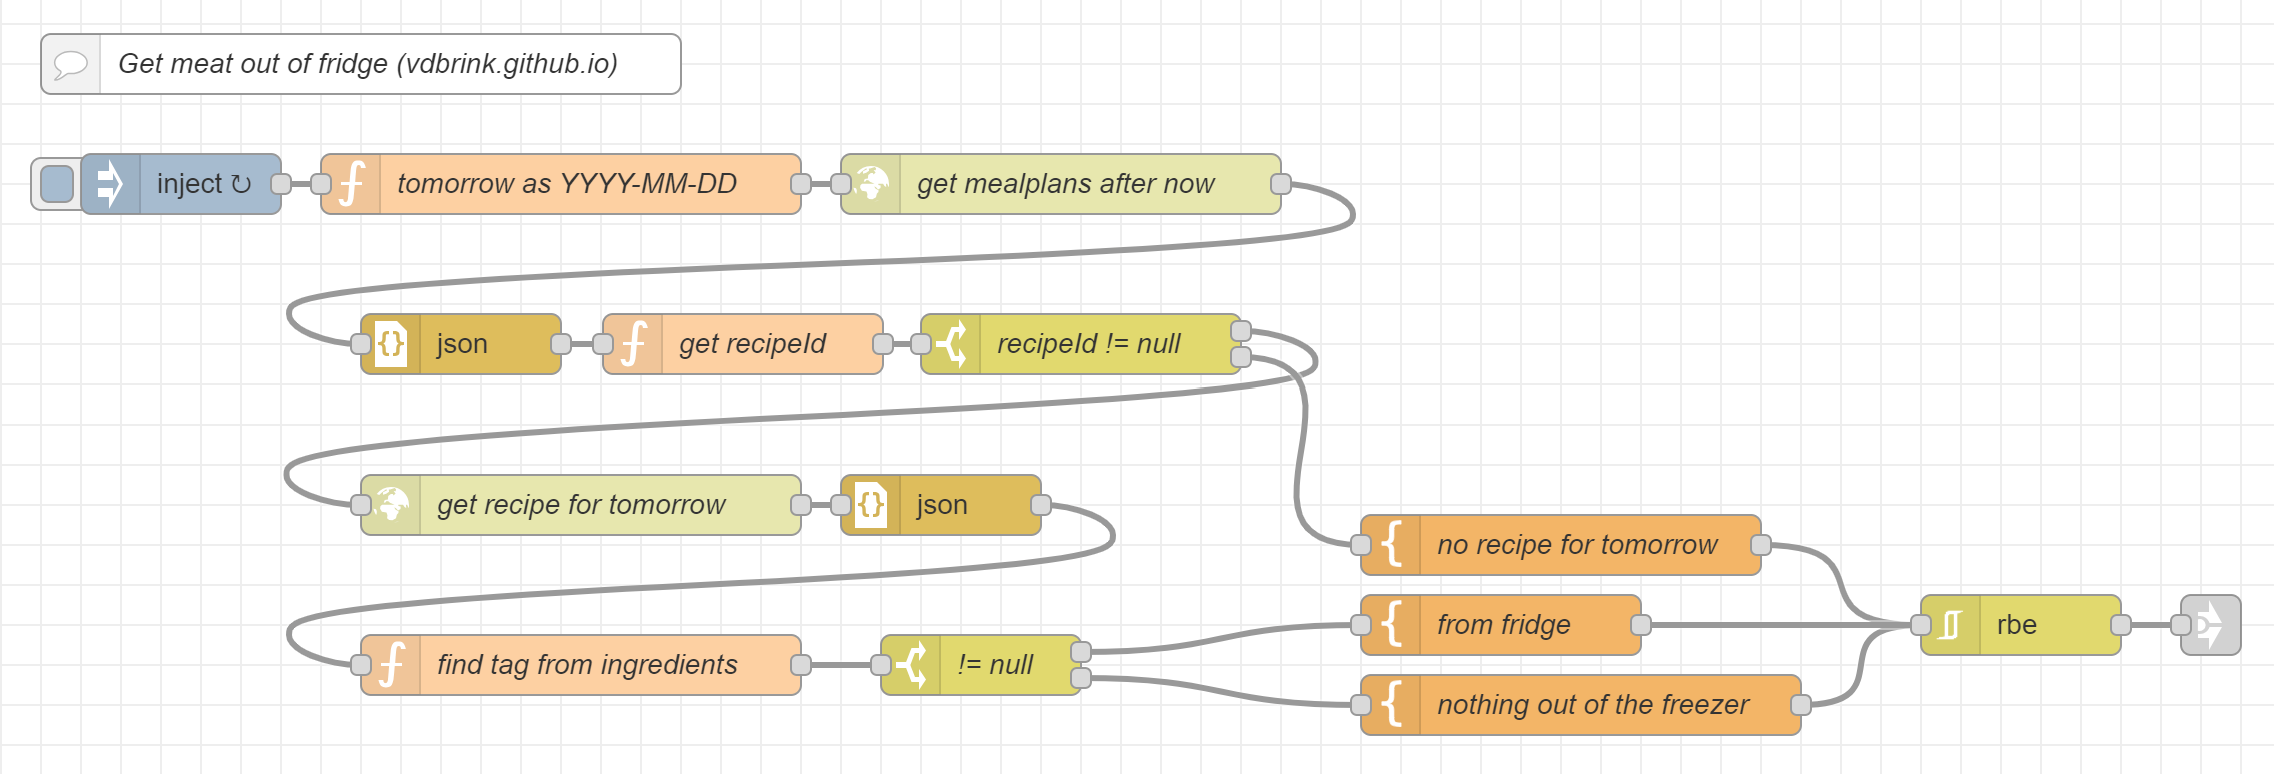
Node-RED flow
[{"id":"bd0839aee9138ce9","type":"tab","label":"Mealie test","disabled":false,"info":"","env":[]},{"id":"74e61f540d6cfdff","type":"inject","z":"bd0839aee9138ce9","name":"","props":[{"p":"topic","vt":"str"}],"repeat":"","crontab":"00 22 * * *","once":false,"onceDelay":0.1,"topic":"","x":110,"y":100,"wires":[["d0a80ee27f0fa9ac"]]},{"id":"403b6a3cd68b67c4","type":"http request","z":"bd0839aee9138ce9","name":"get mealplans after now","method":"GET","ret":"txt","paytoqs":"ignore","url":"http://mealie-recipes:9000/api/households/mealplans?orderBy=date&orderDirection=asc&perPage=1&start_date={{{start_date}}}","tls":"","persist":false,"proxy":"","insecureHTTPParser":false,"authType":"bearer","senderr":false,"headers":[],"x":550,"y":100,"wires":[["1d7bcc9aea364223"]]},{"id":"d0a80ee27f0fa9ac","type":"function","z":"bd0839aee9138ce9","name":"tomorrow as YYYY-MM-DD","func":"let currentDate = new Date();\ncurrentDate.setDate(currentDate.getDate() + 1);\n\n// Format the date to YYYY-MM-DD\nlet year = currentDate.getFullYear();\nlet month = ('0' + (currentDate.getMonth() + 1)).slice(-2); // Adding 1 because months are zero-based\nlet day = ('0' + currentDate.getDate()).slice(-2);\nlet formattedDate = year + '-' + month + '-' + day;\n\nmsg.start_date = formattedDate;\nreturn msg;","outputs":1,"timeout":0,"noerr":0,"initialize":"","finalize":"","libs":[],"x":300,"y":100,"wires":[["403b6a3cd68b67c4"]]},{"id":"dc16d1889207dc1c","type":"http request","z":"bd0839aee9138ce9","name":"get recipe for tomorrow","method":"GET","ret":"txt","paytoqs":"ignore","url":"http://mealie-recipes:9000/api/recipes/{{{recipeId}}}","tls":"","persist":false,"proxy":"","insecureHTTPParser":false,"authType":"bearer","senderr":false,"headers":[],"x":310,"y":260,"wires":[["d2048ea8d9e3ba36"]]},{"id":"f95f8b3686b07a9b","type":"function","z":"bd0839aee9138ce9","name":"get recipeId","func":"if (msg.payload.items.length>0) {\n msg.recipeId = msg.payload.items[0].recipeId;\n}\nreturn msg;","outputs":1,"timeout":0,"noerr":0,"initialize":"","finalize":"","libs":[],"x":391,"y":180,"wires":[["c30cf32f3fb9dcb0"]]},{"id":"1d7bcc9aea364223","type":"json","z":"bd0839aee9138ce9","name":"","property":"payload","action":"","pretty":false,"x":250,"y":180,"wires":[["f95f8b3686b07a9b"]]},{"id":"d2048ea8d9e3ba36","type":"json","z":"bd0839aee9138ce9","name":"","property":"payload","action":"","pretty":false,"x":490,"y":260,"wires":[["18553b8d68008d00"]]},{"id":"18553b8d68008d00","type":"function","z":"bd0839aee9138ce9","name":"find tag from ingredients","func":"var recipe = msg.payload;\n\nmsg.payload = {};\nmsg.payload.recipe_name = recipe.name;\nmsg.payload.fridge = null;\n\nvar keyword = \"freezer\";\nvar tag = \"[\" + keyword +\"]\";\nvar freezerIngredients = Array();\nfor (let i = 0; i < recipe.recipeIngredient.length; i++) {\n var ingredient = recipe.recipeIngredient[i];\n if (ingredient.display.includes(tag)) {\n // remove tag and add to the array\n freezerIngredients.push(ingredient.display.replace(' '+ tag, ''));\n }\n}\nif (freezerIngredients.length > 0) {\n msg.payload.fridge = freezerIngredients.join(\" and \");\n}\nreturn msg;","outputs":1,"timeout":0,"noerr":0,"initialize":"","finalize":"","libs":[],"x":310,"y":340,"wires":[["6600274d3fc3c995"]]},{"id":"ab1563c57ccf9d26","type":"template","z":"bd0839aee9138ce9","name":"from fridge","field":"payload","fieldType":"msg","format":"handlebars","syntax":"mustache","template":"For tomorrow {{payload.fridge}} must get out of the freezer for {{payload.recipe_name}}","output":"str","x":770,"y":320,"wires":[["dd9bfa2ced5eb6ff"]]},{"id":"6600274d3fc3c995","type":"switch","z":"bd0839aee9138ce9","name":"!= null","property":"payload.fridge","propertyType":"msg","rules":[{"t":"nnull"},{"t":"else"}],"checkall":"true","repair":false,"outputs":2,"x":510,"y":340,"wires":[["ab1563c57ccf9d26"],["cb9246ee0de6055b"]]},{"id":"2c49779e764870f5","type":"link out","z":"bd0839aee9138ce9","name":"send message","mode":"link","links":[],"x":1125,"y":320,"wires":[]},{"id":"cb9246ee0de6055b","type":"template","z":"bd0839aee9138ce9","name":"nothing out of the freezer","field":"payload","fieldType":"msg","format":"handlebars","syntax":"mustache","template":"For tomorrow nothing need out of the freezer for {{payload.recipe_name}}","output":"str","x":810,"y":360,"wires":[["dd9bfa2ced5eb6ff"]]},{"id":"c30cf32f3fb9dcb0","type":"switch","z":"bd0839aee9138ce9","name":"recipeId != null","property":"recipeId","propertyType":"msg","rules":[{"t":"nnull"},{"t":"else"}],"checkall":"true","repair":false,"outputs":2,"x":560,"y":180,"wires":[["dc16d1889207dc1c"],["6b12146002663662"]]},{"id":"6b12146002663662","type":"template","z":"bd0839aee9138ce9","name":"no recipe for tomorrow","field":"payload","fieldType":"msg","format":"handlebars","syntax":"mustache","template":"For tomorrow no recipe found","output":"str","x":800,"y":280,"wires":[["dd9bfa2ced5eb6ff"]]},{"id":"9f7205ae535d4aea","type":"comment","z":"bd0839aee9138ce9","name":"Get meat out of fridge (vdbrink.github.io)","info":"","x":200,"y":40,"wires":[]},{"id":"dd9bfa2ced5eb6ff","type":"rbe","z":"bd0839aee9138ce9","name":"","func":"rbe","gap":"","start":"","inout":"out","septopics":true,"property":"payload","topi":"topic","x":1030,"y":320,"wires":[["2c49779e764870f5"]]}]
NOTE: If you have or can convert this into a Home Assistant automation, let me know and I can add it here too.
The flow explanation
- Call the Mealie API to get all the recipes after today
- Endpoint
http://mealie-recipes:9000/api/households/mealplans?orderBy=date&orderDirection=asc&perPage=1&start_date=}
- Endpoint
- Get the first recipe ID
- If there is no recipe found:
- Send a message
For tomorrow no recipe found
- Send a message
- Otherwise, call the Mealie API to get the recipe data with the ingredients
-
- Endpoint
http://mealie-recipes:9000/api/recipes/}
- Endpoint
-
- Filter all ingredients and find in one of them contains the text
[freezer] - If this isn’t found:
- Send a message
For tomorrow nothing need out of the freezer for {recipe_name}
- Send a message
- Otherwise, send a message
For tomorrow {ingredient_from_fridge} must get out of the freezer for {recipe_name} - If the same message was sent before, no new message is sent (in case you have the same meal for 2 days after each other)
Setup
- Define your own host and port number in the endpoints.
- This flow requires a Bearer token to call the Mealie API. Add the token to the two
get ..API nodes. - Link the last node to your own notification flow. I explained here how to use the Companion App to send messages to.
Possible additions
- Trigger the flow also earlier and send the message to a Home Assistant sensor to show it on your dashboard.
I hope you also enjoy using Mealie!
Bookmark for direct import
With a Bookmarklet you can click on a bookmark in your browser, and the current page is automatically imported into your Mealie instance.
It’s a piece of JavaScript in the bookmark that makes this possible.
To make this work:
- Go to https://docs.mealie.io/documentation/community-guide/import-recipe-bookmarklet/ and copy the code
- Go to a bookmarklet generator site
- Paste the code
- Change the url to your own URL
- Click on
Generate Bookmarklet - Copy the code from the
Outputfield - Go to your browser
- Go to your mealie page and bookmark it in your browser
- Edit this bookmark and replace the link with the JavaScript code
Go to a recipe web page and click on the Bookmarklet, now this recipe will be imported into YOUR Mealie!
Ollama integration
With the OpenAI/Ollama integration, you can activate the feature to upload recipe image and extract the data into a new recipe.
# Sourcecode by vdbrink.github.io
# docker-compose.yaml
  ....
  # Ollama
  OPENAI_SEND_DATABASE_DATA: "true"
  OPENAI_ENABLE_IMAGE_SERVICES: "true"
  OPENAI_BASE_URL: http://192.168.1.11:11434/v1
  OPENAI_API_KEY: "ollama"
  OPENAI_MODEL: "llama3.2:latest"
Alternative models: mistral-nemo:latest
FAQ
Q: What are the default user credentials?
A: Username: changeme@email.com
Password: MyPassword
Q: How to set a different locale?
A: In the side menu go to settings, here you can change the locale.
Q: How can I create a Bearer token?
A: Go to your local Meal website url /user/profile/api-tokens
Create a new token and
save this private value in the secrets.yaml file.
# Sourcecode by vdbrink.github.io
# secrets.yaml
mealie_bearer: "Bearer ey....."
Q: Can I add a YouTube recipe instruction movie to my recipe?
A: Yes, you can with this code block in the description.
<iframe width="560" height="315" src="https://www.youtube.com/embed/dQw4w9WgXcQ" frameborder="0" allow="accelerometer; autoplay; clipboard-write; encrypted-media; gyroscope; picture-in-picture" allowfullscreen></iframe>
Q: Can I disable the required login?
A: No, but you can increase the hours your login token is valid. The default value is 48 hours.
Use the environment variable TOKEN_TIME to increase this time to something like 87600 (10 years).
Q: Where can I find more info about Mealie?
A: Check out the website or Discord
« See also my other Home Assistant tips and tricks
^^ Top | Homepage | Best Buy Tips | Automation Ideas | Blog posts