Home Assistant dashboard: Weather in The Netherlands
![]()
Here you can find dashboard related to the weather in the Netherlands.
There are a lot of weather sites that provide weather data on the web or in apps. We can also use that data to show directly on our Home Assistant dashboards.
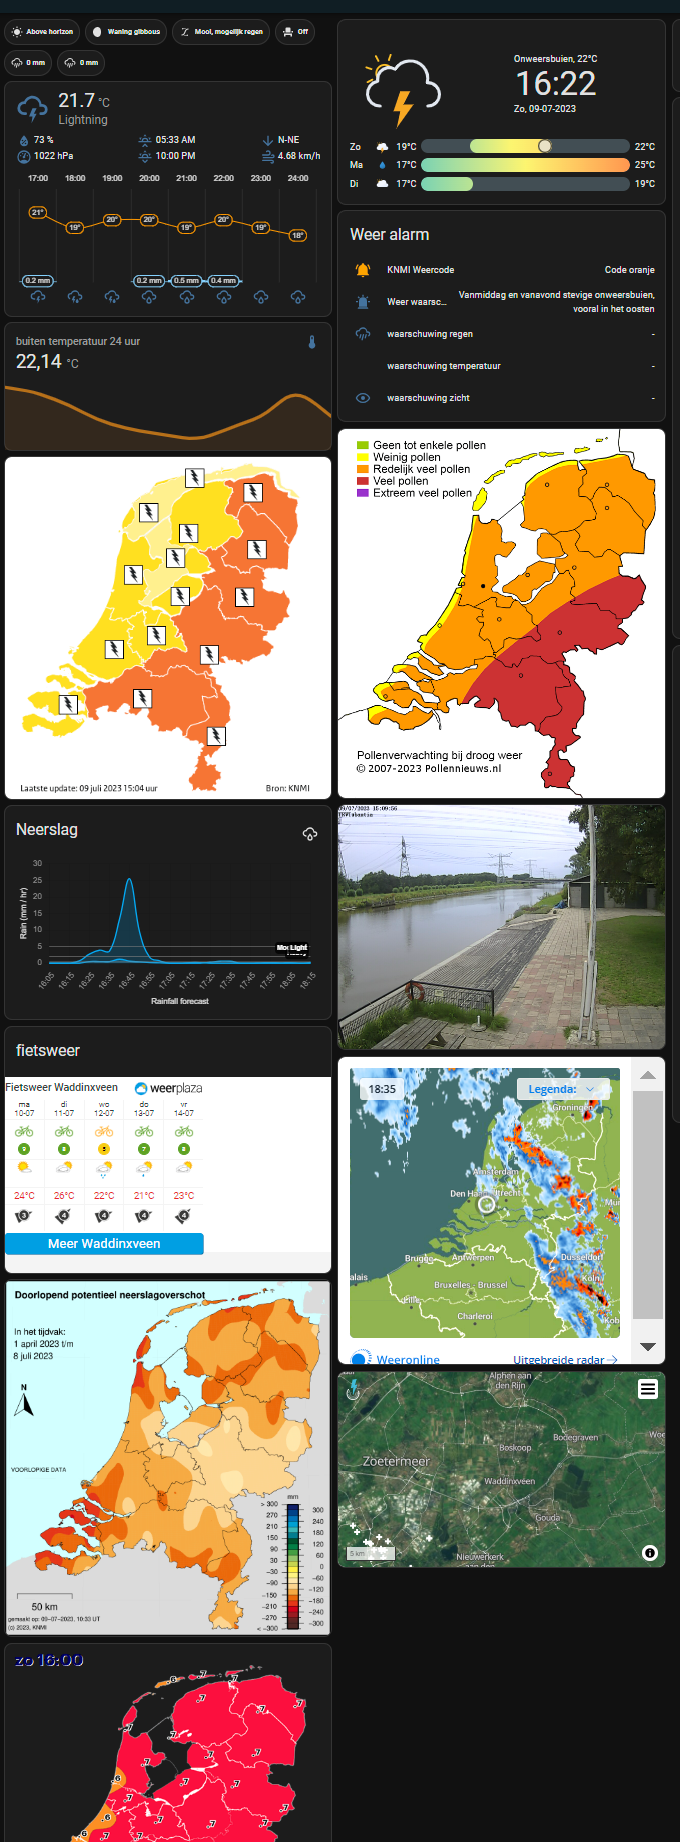
Table of Contents
- Neerslag App
- Rain expected value
- Rain radar animated
- Weather alarm map
- Weather alarm
- Pollen
- Precipitation surplus (neerslagoverschot)
- Bike/BBQ/Terrace weather score upcoming days
- Animated weather predictions
- Weather predictions
Neerslag App
Show expected rain from the possible Dutch sources Buienalarm and Buienradar.

Repo: https://github.com/aex351/home-assistant-neerslag-app
Install this integration via this button in your own Home Assistant instance.

# Sourcecode by vdbrink.github.io
# Dashboard card code
type: custom:neerslag-card
title: Neerslag
entities:
- sensor.neerslag_buienalarm_regen_data
- sensor.neerslag_buienradar_regen_data
Rain expected value
Based on the Buienalarm data: a number how much rain is expected.
# Sourcecode by vdbrink.github.io
# Dashboard card code
- platform: template
  sensors:
    buienalarm_rain_expected:
      friendly_name: "rain expected"
      value_template: >-
        {% set rain = state_attr('sensor.neerslag_buienalarm_regen_data', 'data').precip %}
        {% set total_precip = 0 %}
        {% for value in rain %}
          {% set total_precip = total_precip + (value | int) %}
        {% endfor %}
        {{ total_precip }}
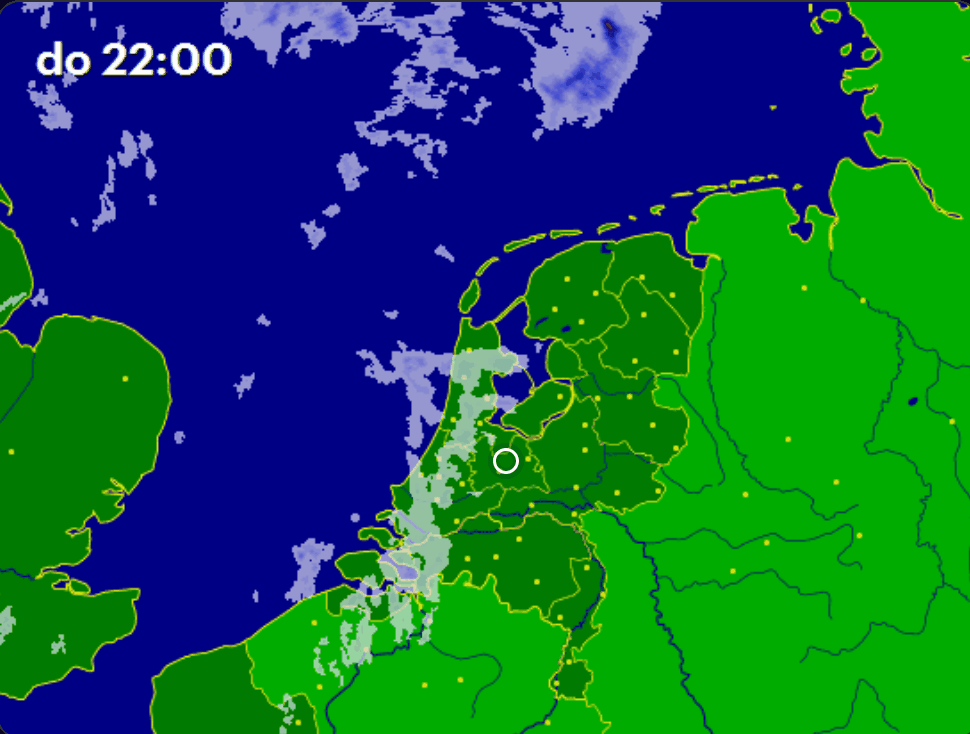
Rain radar animated
Buienradar with residence marker
Buienradar has a Home Assistant integration which contains, next to weather entities, also an animation of the rain expectation for The Netherlands.
I added myself an extra residence marker to it !!!!
Result
Installation
You need to install the Buienradar integration with this button

Enable the radar entity
Enable the Buienradar radar entity camera.buienradar, this one is disabled by default.
See how to do this:
Or direct go to all entities  and filter on
 camera.buienradar.
Create the dashboard card
Now all preparations are done, the dashboard card can be created.
Add a new card to your dashboard (or edit your existing) with this content
and change the top and left properties to position the marker to your residence.
And use scale to change the size of the image.
The marker looks like this: 
You can also use any other images you like better.
# Sourcecode by vdbrink.github.io
# Dashboard card code
type: picture-elements
camera_image: camera.buienradar
camera_view: live
aspect_ratio: '1:0.75'
elements:
  - type: image
    image: https://vdbrink.github.io/homeassistant/images_weather/marker_home.svg
    style:
      top: 60%
      left: 50%
      scale: 100%
(The aspect_ratio is needed because by default only half of the image is shown.)
Alternative implementation
Instead of an online file, it’s also possible to use a camera entity or download the file locally.
> Click here to see the other examples with: camera entity / local file >>
Via a camera image
Add a Generic camera integration:
Use the url https://raw.githubusercontent.com/vdbrink/vdbrink.github.io/main/homeassistant/images_weather/marker_home.svg
It’s this marker
Rename the sensor to camera.marker_home
# Sourcecode by vdbrink.github.io
# Dashboard card code
type: picture-elements
camera_image: camera.buienradar
camera_view: live
aspect_ratio: '1:0.75'
elements:
  - type: image
    entity: camera.marker_home
    camera_image: camera.marker_home
    style:
      top: 60%
      left: 50%
      scale: 100%
Via a local image
You can also use the image as a local image.\
Download the file https://raw.githubusercontent.com/vdbrink/vdbrink.github.io/main/homeassistant/images_weather/marker_home.svg
and place if in your local Home Assistant /www/ directory.\
And use this script:
# Sourcecode by vdbrink.github.io
# Dashboard card code
type: picture-elements
camera_image: camera.buienradar
camera_view: live
aspect_ratio: '1:0.75'
elements:
  - type: image
    image: /local/marker_home.svg
    style:
      top: 60%
      left: 50%
      scale: 100%
Weeronline
Via the link https://www.weeronline.nl/widgets you can select multiple widgets and the corresponding city. These widgets can be include via an iframe on your dashboard.
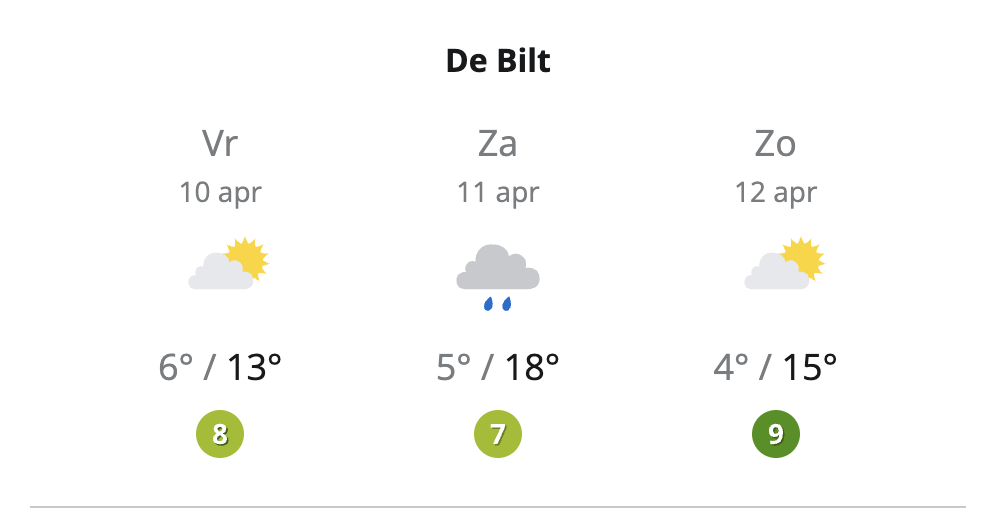
3 days weather predictions
Three days weather predictions.
# Sourcecode by vdbrink.github.io
# Dashboard card code
type: iframe
url: https://www.weeronline.nl/widget/weather?id=4058458
aspect_ratio: "1.7"
Rain Radar
An animated image of 2 hours prediction of the rain in steps of 5 minutes.

# Sourcecode by vdbrink.github.io
# Dashboard card code
type: iframe
url: https://www.weeronline.nl/widget/radar?id=135
aspect_ratio: '1.06'
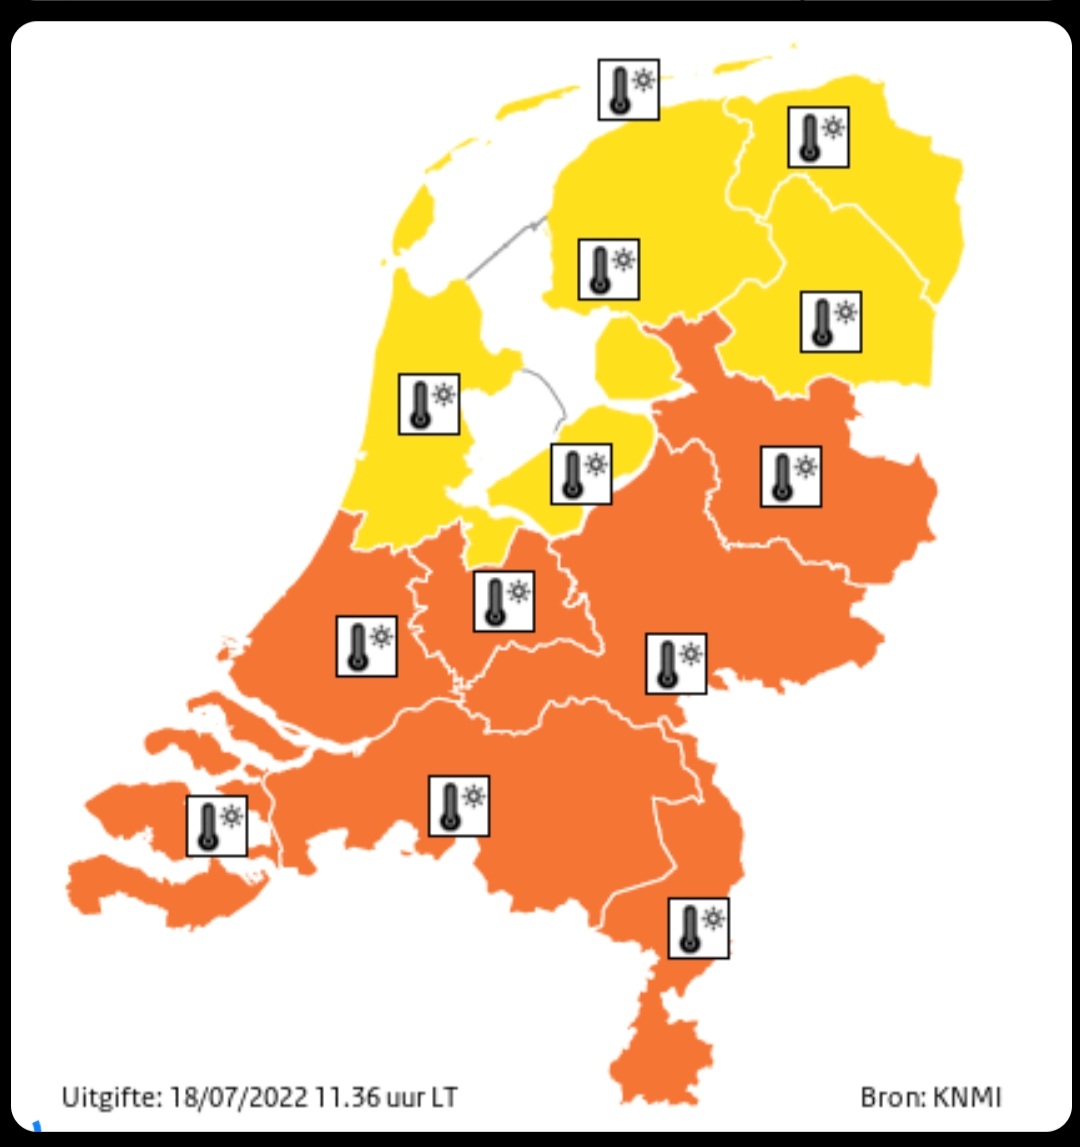
Weather alarm map
Source: KNMI
Alarm code colors per province.
# Sourcecode by vdbrink.github.io
# Dashboard card code
type: picture-elements
image: https://cdn.knmi.nl/knmi/map/current/weather/warning/waarschuwing_land_0_new.gif
elements:
- type: image
  title: Weercode
  tap_action:
  action: url
  url_path: https://knmi.nl
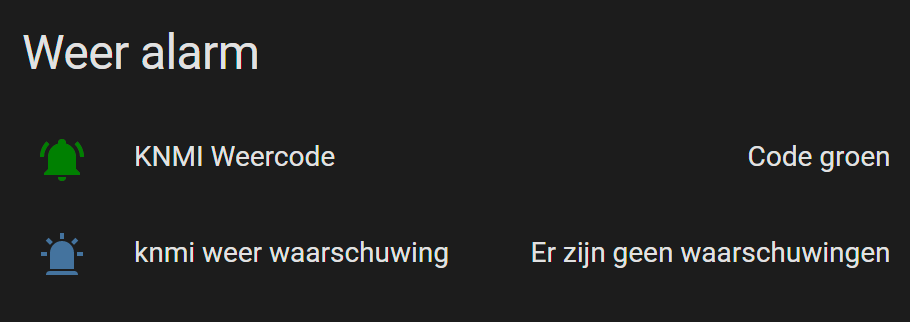
Weather alarm
Source: KNMI
Show the weather alarm code and description from the KNMI.nl site direct on your dashboard like this:
First, you need to define a scraper to scrape every 10 minutes the latest alarm code and description.
You can accomplish this by adding the YAML to the configuration.yaml file or by configure it via the Home Assistant frontend Scrape integration.
I also have a dedicated page about this integration, how it can be used to integrate almost any website data direct into your dashboard.
Install this integration via this button in your own Home Assistant instance.
# Sourcecode by vdbrink.github.io
# configuration.yaml
- platform: scrape
  resource: https://www.knmi.nl/nederland-nu/weer/waarschuwingen/overijssel
  select: "div.alert__heading"
  name: "knmi weercode"
  scan_interval: 600

- platform: scrape
  resource: https://www.knmi.nl/nederland-nu/weer/waarschuwingen/overijssel
  select: "a.alert__description"
  name: "knmi weer waarschuwing"
  scan_interval: 600
Weather alarm with colored icon
Weather alarm block with a colored icon in the color of the alarm.
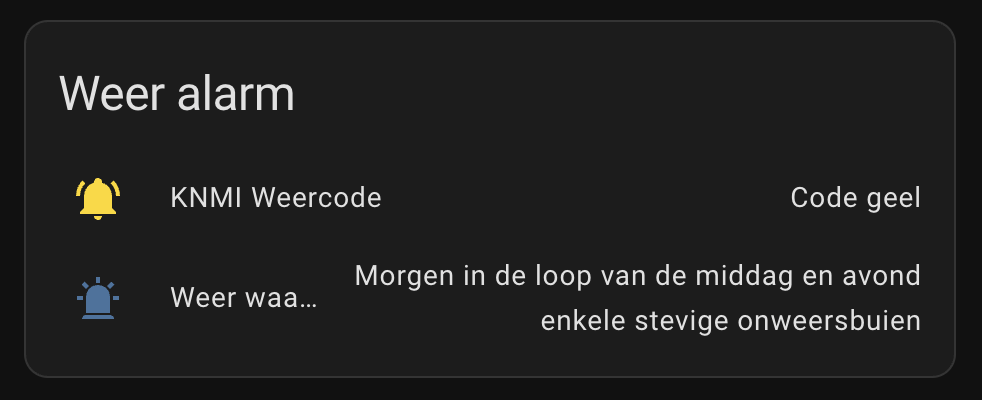
The custom CSS color styling is done with the HACS module lovelace-card-mod.
Install this integration via this button in your own Home Assistant instance.
Corresponding YAML code:
# Sourcecode by vdbrink.github.io
# Dashboard card code
type: entities
title: Weer alarm
entities:
    - entity: sensor.knmi_weercode
      name: KNMI Weercode
      icon: mdi:bell-ring
      card_mod:
        style: |
          :host {
              --card-mod-icon-color:
              {% if is_state('sensor.knmi_weercode', 'Code groen') %}
                #008000;
              {% elif is_state('sensor.knmi_weercode', 'Code geel') %}
                #ffd700;
              {% elif is_state('sensor.knmi_weercode', 'Code oranje') %}
                #ffa500;
              {% elif is_state('sensor.knmi_weercode', 'Code rood') %}
                #CC0000;
              {% else %}
                #44739e
              {% endif %}
          }
    - entity: sensor.knmi_weer_waarschuwing
      icon: mdi:alarm-light
show_header_toggle: true
state_color: true
Check the styling page for more ways to give elements the color of the weather alarm.
Conditional weather alarm 1
You can add this data also to a section on your dashboard with Important data and only show this information when it’s not code green.
The text is also clickable to open the corresponding site with more details.

# Sourcecode by vdbrink.github.io
# Dashboard card code
- type: entities
  entities:
    - type: conditional
      conditions:
        - entity: sensor.knmi_weercode
          state_not: Code groen
      row:
        entity: sensor.knmi_weercode
        tap_action:
          action: url
          url_path: >-
            https://www.knmi.nl/nederland-nu/weer/waarschuwingen/overijssel
    - type: conditional
      conditions:
        - entity: sensor.knmi_weercode
          state_not: Code groen
      row:
        entity: sensor.knmi_weer_waarschuwing
        tap_action:
          action: url
          url_path: >-
            https://www.knmi.nl/nederland-nu/weer/waarschuwingen/overijssel
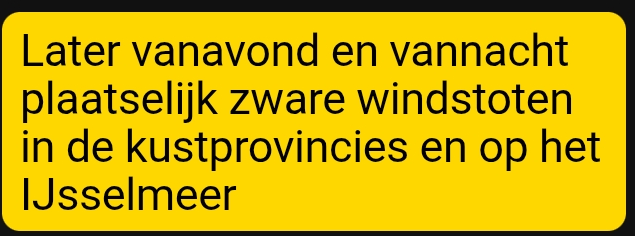
Conditional weather alarm 2
Based on the KNMI weather alarm website data is this another presentation. It shows the weather alarm text in a large size with the background card color the same as the weather alarm level, green, yellow, orange or red.
For this card I used the extra HACS integrations Mushroom card and card_mod to add the custom color styling.
This YAML codes show the card only when the weather code is not code green (unavailable).
To show the alarm also when there is no alarm, just remove the type: conditional block and only use the YAML code starting from type: custom:mushroom-title-card.
This is the corresponding code with a bigger font size:
type: conditional
conditions:
  - entity: sensor.knmi_weercode
    state_not: unavailable
card:
  type: custom:mushroom-title-card
  title: |
    {{ states('sensor.knmi_weer_waarschuwing') | replace('.', '.\n') }}
  card_mod:
    style: |
      ha-card {
        background:
        {% if is_state('sensor.knmi_weercode', 'Code groen') %}
         #008000 !important;
        {% elif is_state('sensor.knmi_weercode', 'Code rood') %}
         #CC0000 !important;
        {% elif is_state('sensor.knmi_weercode', 'Code geel') %}
         #ffd700 !important;
        {% elif is_state('sensor.knmi_weercode', 'Code oranje') %}
         #ff6f00 !important;
        {% else %}
         #44739e !important;
        {% endif %}
        --title-color: #000 !important;
        padding-top: 10px !important;
        h1 {
           font-size: 45px !important;
           line-height: 45px !important;
           font-weight: bold !important;
        }
       }
Pollen
image
Source: Pollennieuws
Show the current pollen intensity image.
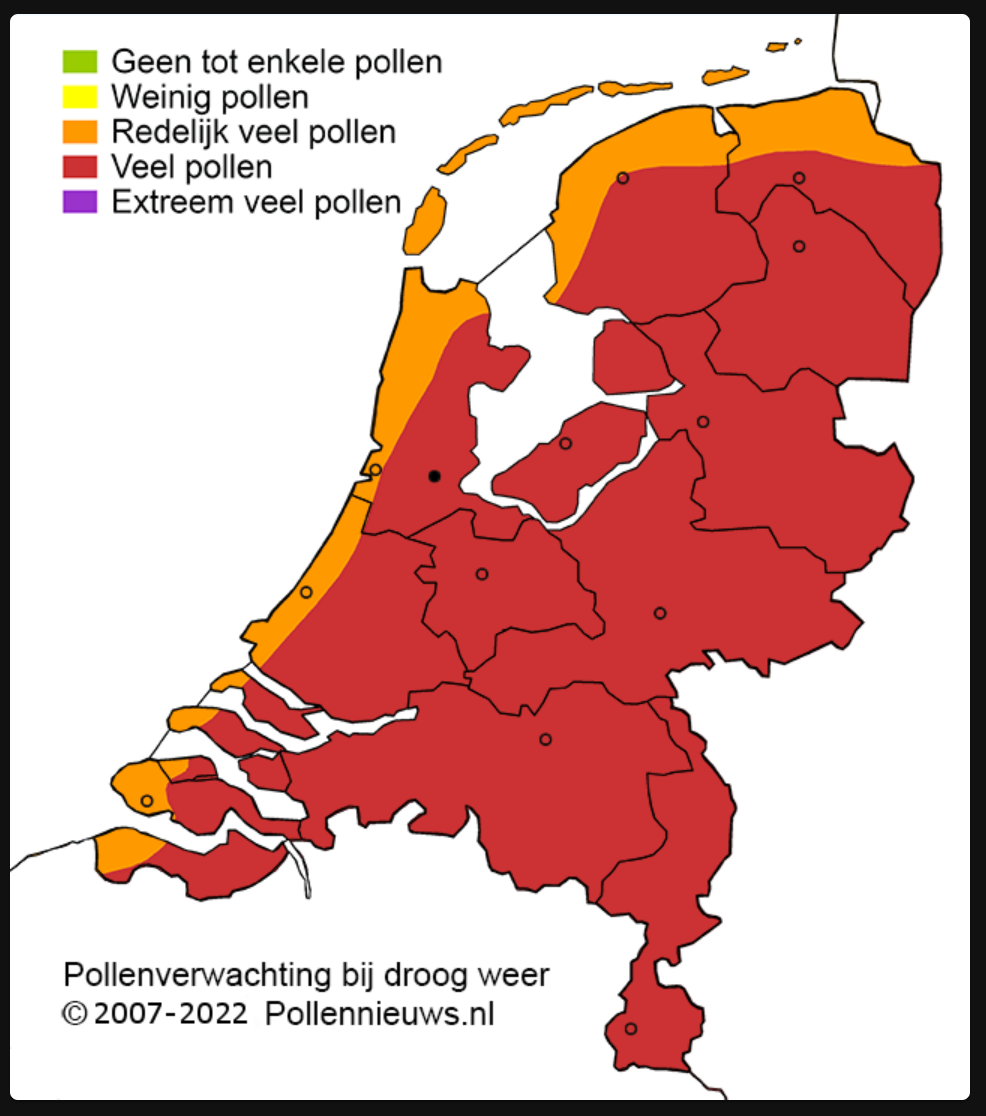
This is the basic variant that shows only the image.
# Sourcecode by vdbrink.github.io
# Dashboard card code
type: picture-elements
image: https://pollennieuws.nl/weerkaart/KaartNL_280-website.png
In this version, it’s possible to also click on the image to open the Pollennieuws website.
You have to place the overlay image black.png in the Home Assistant www directory first.
# Sourcecode by vdbrink.github.io
# Dashboard card code
type: picture-elements
image: https://pollennieuws.nl/weerkaart/KaartNL_280-website.png
elements:
- type: image
  title: Pollennieuws
  tap_action:
    action: url
    url_path: https://pollennieuws.nl
  image: /local/black.png
  aspect_ratio: 1x1
  style:
    top: 0%
    left: 0%
    height: 200%
    width: 228%
    opacity: 0%
Kleenex pollen radar Integration
Check out my dedicated page about this integration.
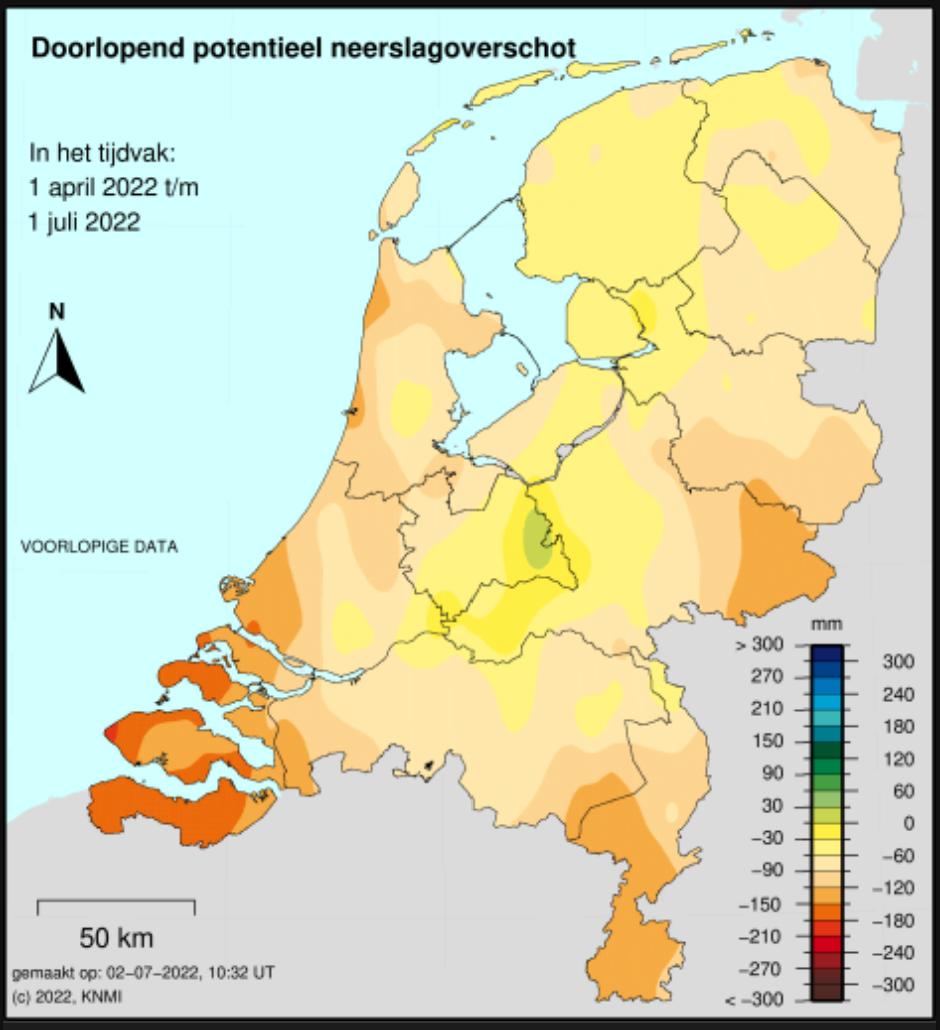
Precipitation surplus (neerslagoverschot)
Source: KNMI
Image with the precipitation surplus (neerslagoverschot) for (the last) 3 months.
# Sourcecode by vdbrink.github.io
# Dashboard card code
type: picture-elements
image: >-
  https://cdn.knmi.nl/knmi/map/page/klimatologie/geografische-overzichten/rdev/rdev_geografisch.png
elements:
  - type: image
    title: Neerslagoverschot
Bike/BBQ/Terrace weather score upcoming days
Source: Weerplaza
An iframe with a compact presentation of the weather for the next 3 or 5 days and a score for different type of activities.
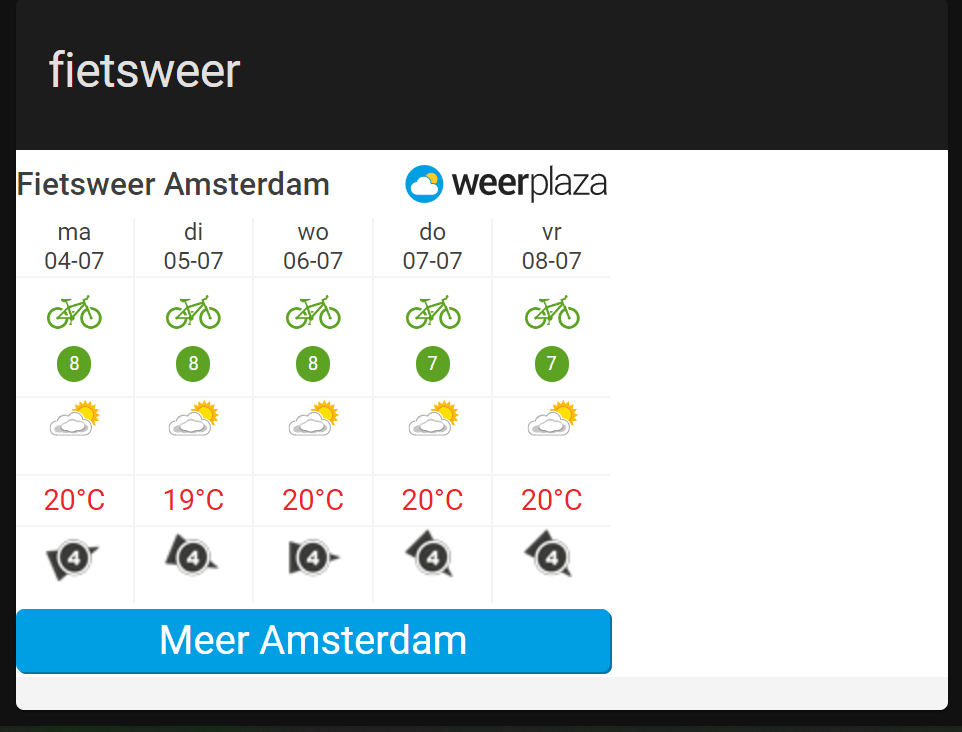
Find more widgets at https://www.weerplaza.nl/weerwidgets/
# Sourcecode by vdbrink.github.io
# Dashboard card code
type: iframe
url: https://www.weerplaza.nl/weerwidgets/activiteit/?YT1maWV0cyZnaWQ9NTU3NQ==
aspect_ratio: 60%
title: fietsweer
Animated weather predictions
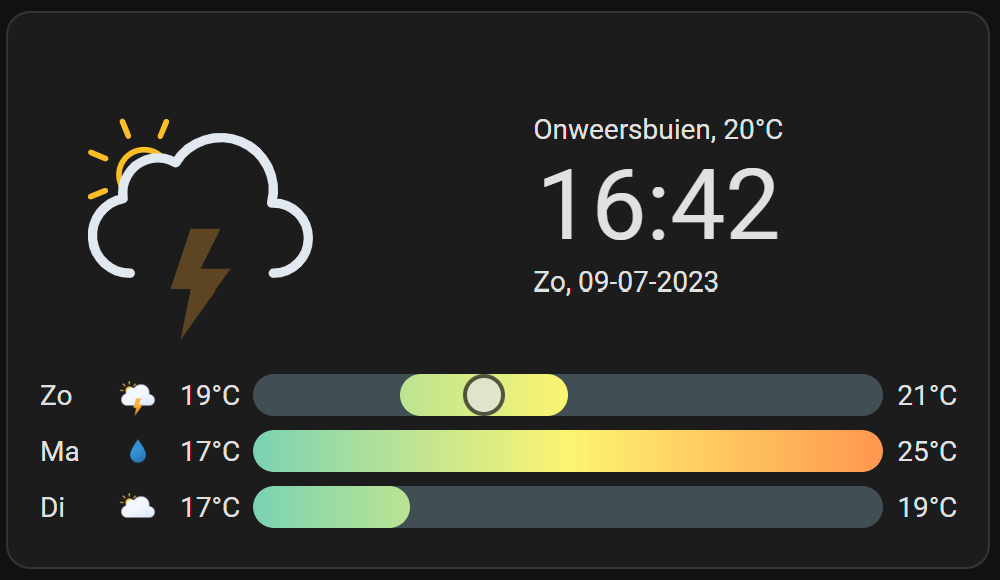
Install the HACS clock-weather-card integration via this button
# Sourcecode by vdbrink.github.io
# Dashboard card code
type: custom:clock-weather-card
entity: weather.home
forecast_days: 3
locale: nl
time_format: 24
date_pattern: P
hide_today_section: false
hide_forecast_section: false
This card is highly customizable. To show more days, no clock and also the expected weather per weather hour.
This is the corresponding code:
# Sourcecode by vdbrink.github.io
# Dashboard card code
type: custom:clock-weather-card
entity: weather.forecast_home
forecast_days: 5
locale: nl
time_format: 24
hide_clock: true
date_pattern: ""
hide_today_section: true
hide_forecast_section: false
hourly_forecast: true
forecast_rows: 12
Weather predictions
Nice overview of the current weather predictions.
Install the HACS weather-chart-card integration via this button
Example 1
With current weather conditions.
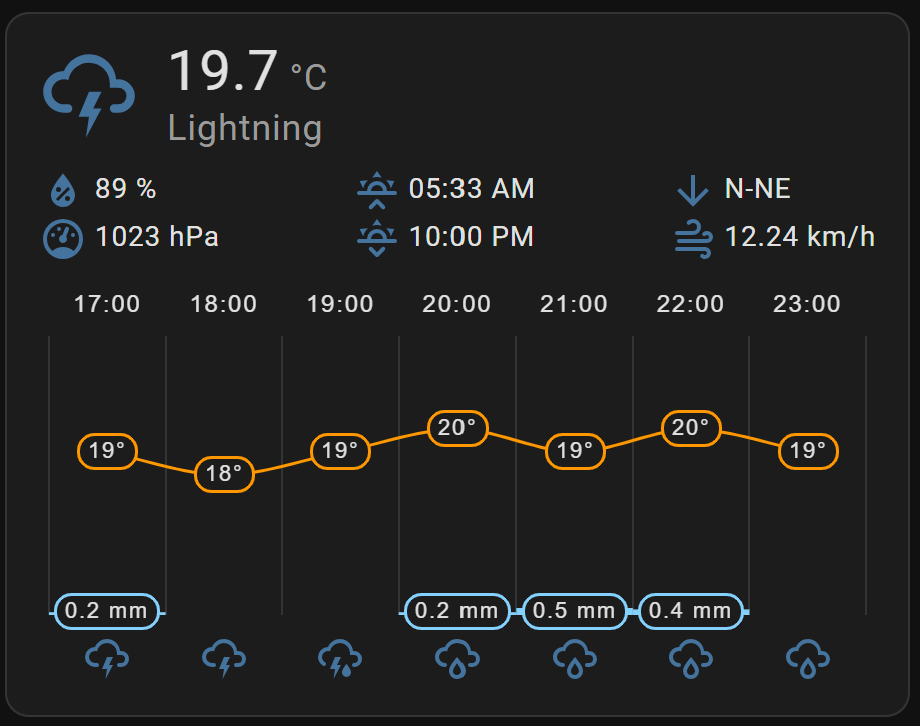
# Sourcecode by vdbrink.github.io
# Dashboard card code
type: custom:weather-chart-card
entity: weather.home
Example 2
Only with forecast data and alternative style 2.
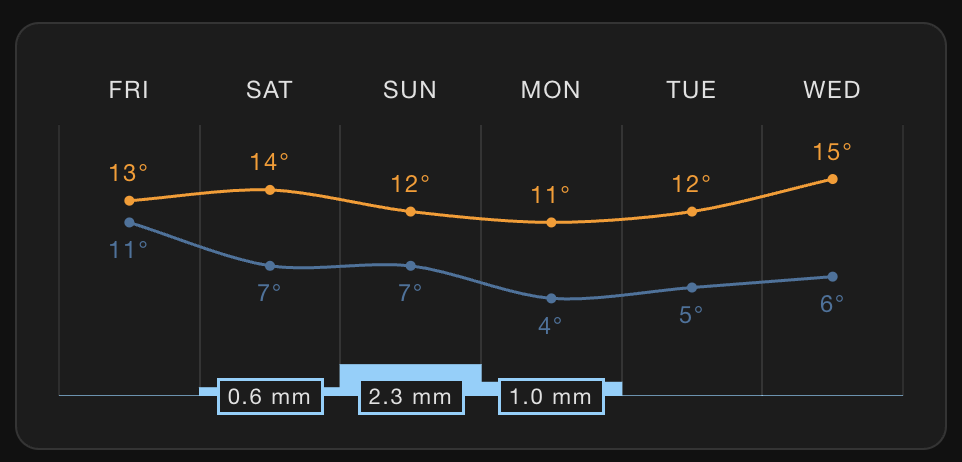
# Sourcecode by vdbrink.github.io
# Dashboard card code
type: custom:weather-chart-card
entity: weather.forecast_home
forecast:
  style: style2
  round_temp: true
  condition_icons: false
  show_wind_forecast: false
show_main: false
show_attributes: false
« See also my other Home Assistant tips and tricks
^^ Top | Homepage | Best Buy Tips | Automation Ideas | Blog posts