Home Assistant dashboard:
Stretch Display Layout
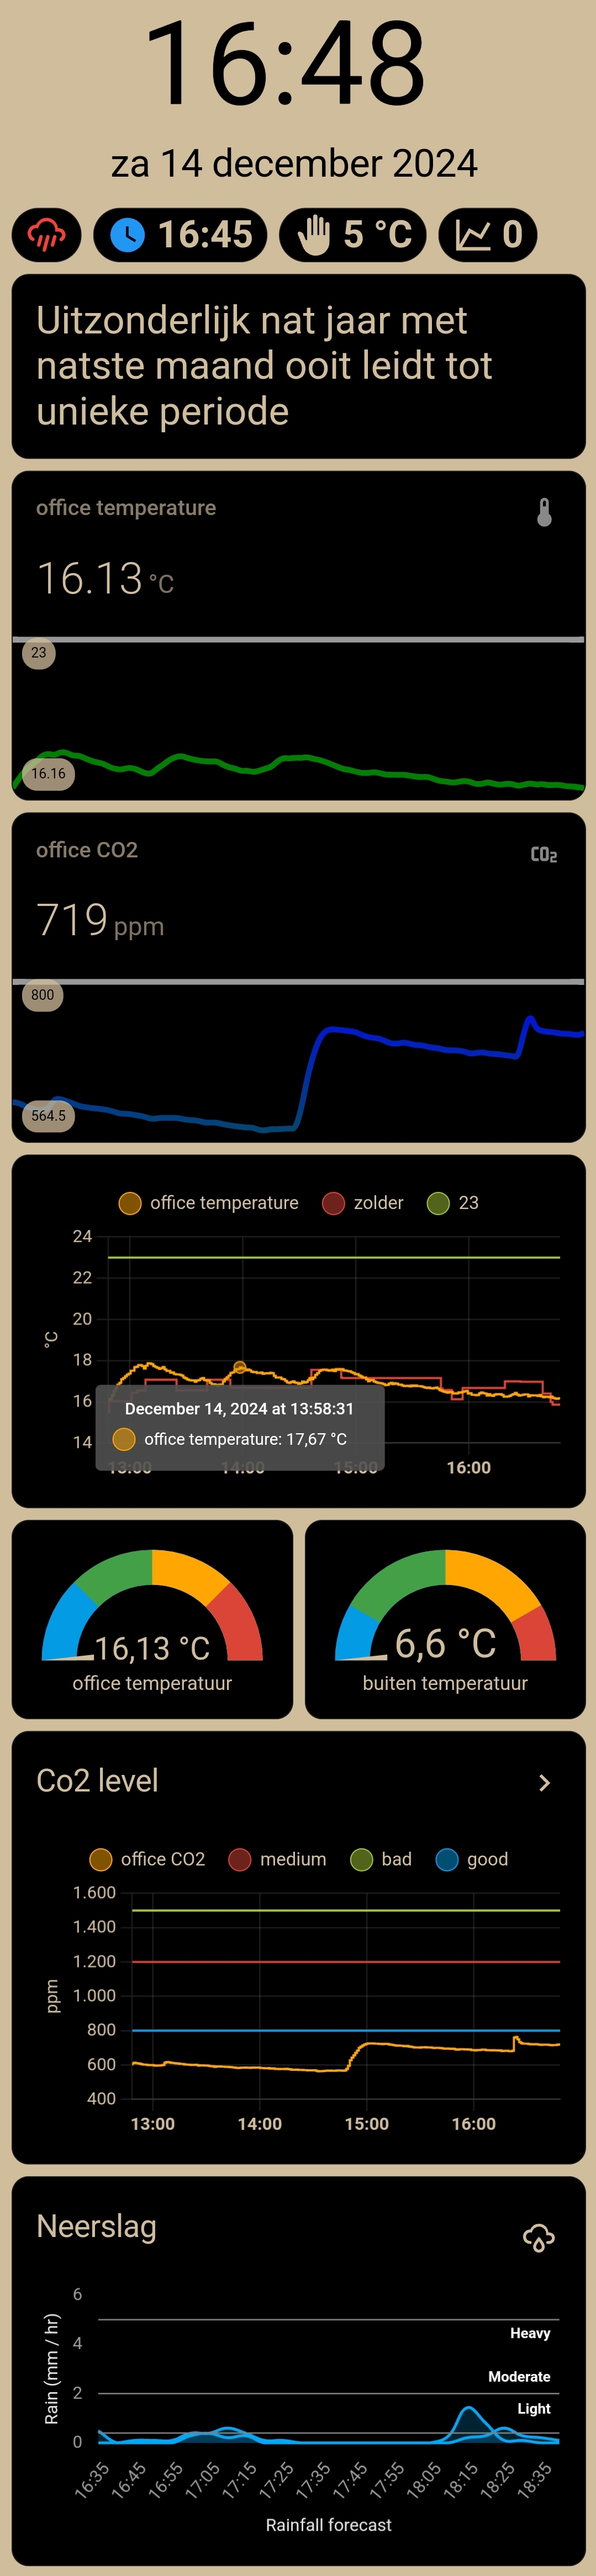
![]() I bought a long-stretched small 8.8” display to show directly my room and important house status on it.
I bought a long-stretched small 8.8” display to show directly my room and important house status on it.
The default Home Assistant dashboard elements show the text not big enough if you look at it from a distance. That’s why I created two custom themes (to test which looks better) for more contrast and less element borders. I also modified several dashboard elements to show the text bigger.
On this page, I describe how I created the different elements with the corresponding YAML code. You can copy-paste if you want to reuse it for yourself.
This is how the dashboard looks like on the display:

Check here for the hardware section where I describe how I set up the hardware.
Table of Contents
Introduction
 I wanted a display to show the current room healthy information and other live data around the house.
Now I show the next data on this stretched display:
- Room temperature (+graph), CO2 (+graph), humidity, room heater status, chair occupancy time,
- Time & date, news headline.
- Outside temperature, rain is expected.
- I also have many Conditional elements.
By default, not visible only when they have a noticeable state they will be visible.
- Camera stream if someone is at the front door.
- CO2 value too high.
- Temperature is too high.
- Front-/back-/office door opened.
- Heater is on.
- Rain is expected.
I created and tested two different themes to see which one works best.
Hide top toolbar
We want to hide this top menu by default.
Install the kiosk-mode integration via this button

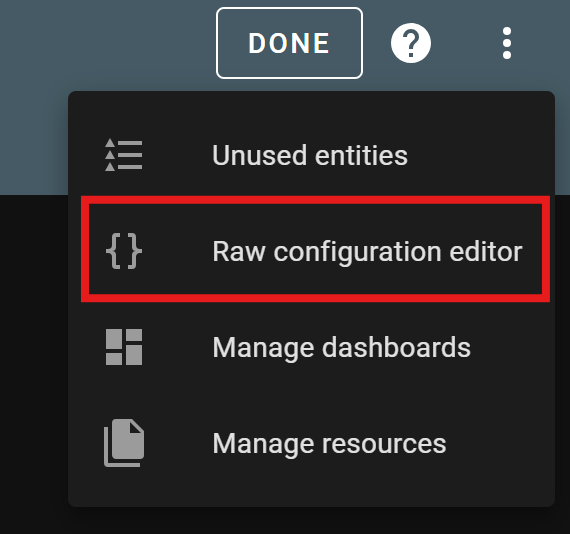
To set these properties, select the three dots in the top right and select Raw configuration editor.
See all possible configuration parameters at https://github.com/NemesisRE/kiosk-mode
Only define hide_header is enough.
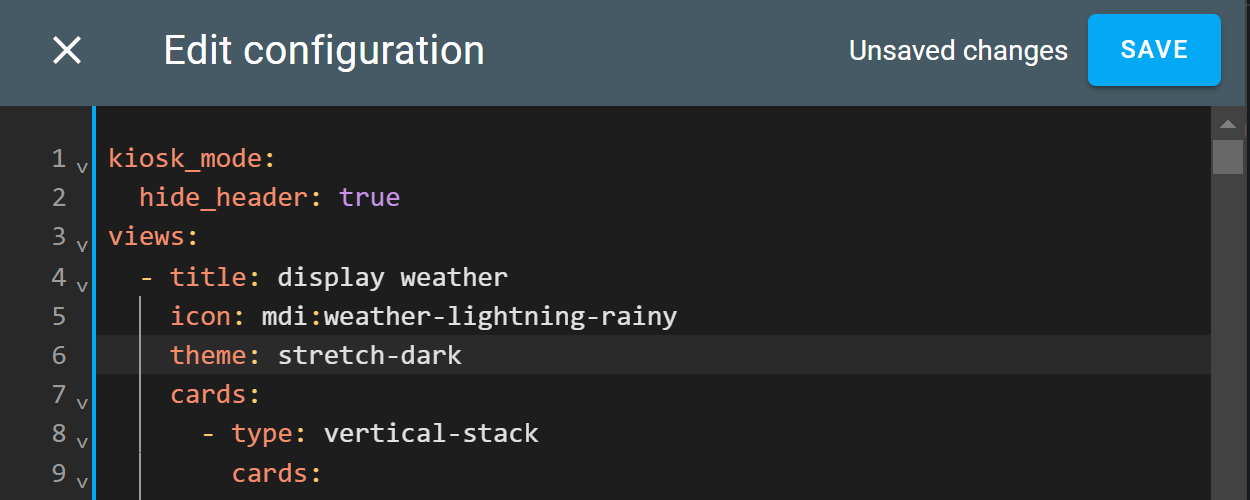
# Sourcecode by vdbrink.github.io
# Raw configuration editor
kiosk_mode:
  hide_header: true
views:
  ...
To show the top toolbar again, add ?disable_km= to the url.
Custom themes
I created two custom themes for this project to see which has the best contrast and best looks.
- Stretch Charamel: This theme uses black and charamel color as contrast colors.
- Stretch Dark: This theme uses all black and other contrast colors with the same card background as normal background. Only subtle lines to split elements from each other.
| Stretch Charamel | Stretch Dark |
|---|---|
|
 |
| download stretch_charamel.yaml | download stretch_dark.yaml |
Install new theme
Reload theme after update
- Go to
Developer tools. - Go to tab
Actions.
You can quickly go there via this link:

- Select
Home Assistant Frontend: Reload themes. - Press the button
Perform action.
Or create a button on your dashboard to trigger the reload of the themes.
type: custom:button-card
entity: zone.home
icon: mdi:restart
name: Theme Restart
tap_action:
  action: call-service
  service: frontend.reload_themes
Dashboard elements
Here I describe how I realize the different elements that are visible on this stretched display.
I add some custom CSS to the dashboard elements if I couldn’t get it correct via the theme.
- Time and date
- Room temperature
- CO2
- Humidity
- News headline
- Conditional elements
- Textual weather
- Gauge
- Flexible Horseshoe card
Time and date
I want the time and date as large font size visible.
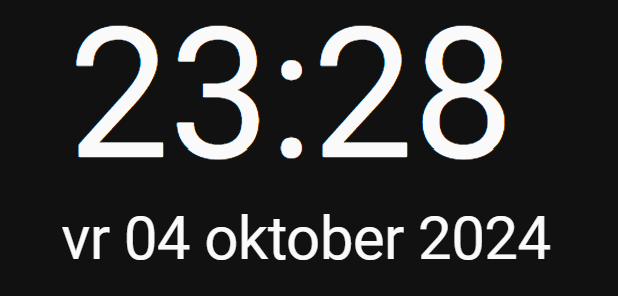
For the current time, it doesn’t use a sensor just the current time. With some extra CSS is the size bigger now.
# Sourcecode by vdbrink.github.io
- type: custom:mushroom-title-card
  title: '{{now().strftime(''%H:%M'')}}'
  alignment: center
  card_mod:
    style: |
      ha-card {
        --title-font-size: 90px !important;
      }
For the current date, I use a custom sensor with translated (to Dutch) spelled out day and month as text. With some extra CSS is the size bigger now.
# Sourcecode by vdbrink.github.io
- type: custom:mushroom-title-card
  title: {{states('sensor.date_only_formatted')}}
  alignment: center
  card_mod:
    style: |
      ha-card {
        --title-font-size: 30px !important;
      }
Room temperature
Colored line
For the current room temperature, I used my own DIY ESPHome CO2, temperature, humidity sensor.
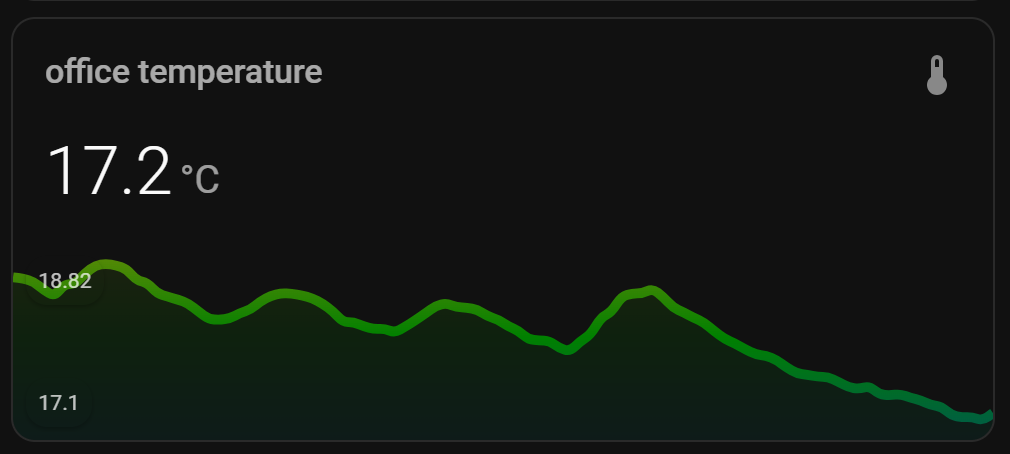
This card required the HACS integration mini-graph-card,
install this integration via this button
# Sourcecode by vdbrink.github.io
type: custom:mini-graph-card
entities:
  - sensor.espscd40_co2_temperature
show:
  labels: true
hours_to_show: 4
points_per_hour: 24
color_thresholds:
  - value: 15
    color: "#0000FF"
  - value: 18
    color: "#008000"
  - value: 20
    color: "#f39c12"
  - value: 21
    color: "#d35400"
  - value: 23
    color: "#c0392b"
Multiple lines
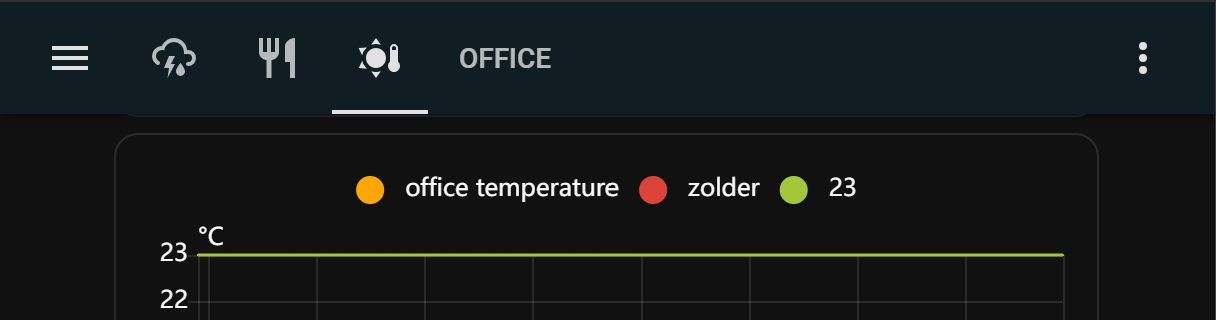
One line for a fixed 23 value, one for the room temperature on one side and one for the temperature on the other side of the room.
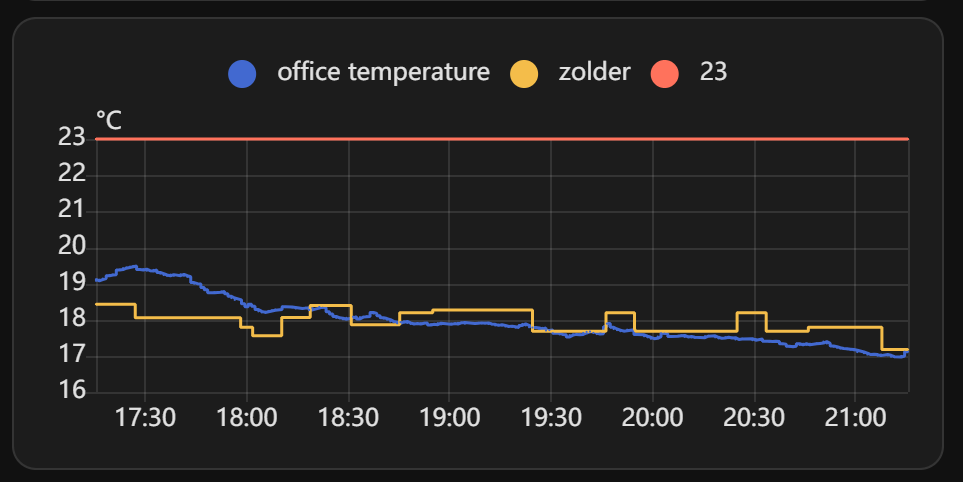
# Sourcecode by vdbrink.github.io
type: history-graph
entities:
  - entity: sensor.espscd40_co2_temperature
  - entity: sensor.temp_temperature
  - entity: sensor.temp_value_23
hours_to_show: 4
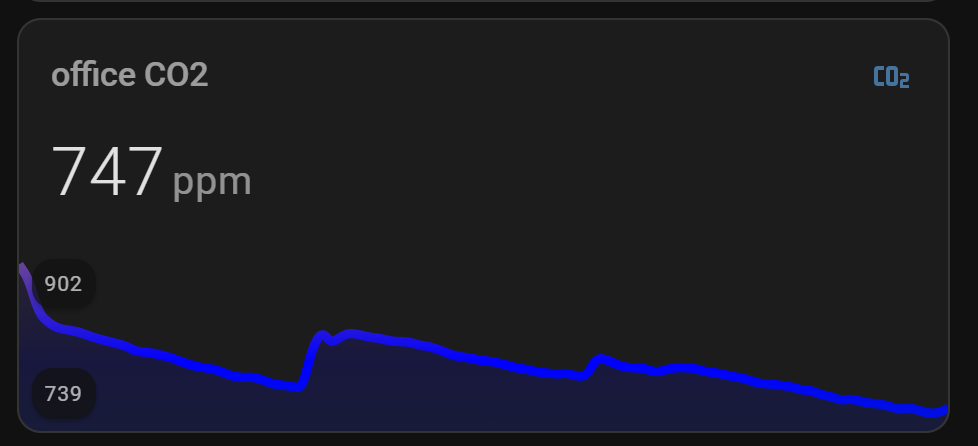
CO2
Colored line
For the current CO2 value in the room, I used my own DIY ESPHome CO2, temperature, humidity sensor.
# Sourcecode by vdbrink.github.io
type: custom:mini-graph-card
entities:
  - sensor.scd40_co2
show:
  labels: true
hours_to_show: 4
points_per_hour: 24
color_thresholds:
  - value: 400
    color: "#008000"
  - value: 800
    color: "#0000FF"
  - value: 1000
    color: "#f39c12"
  - value: 1200
    color: "#d35400"
  - value: 2000
    color: "#c0392b"
Multiple lines
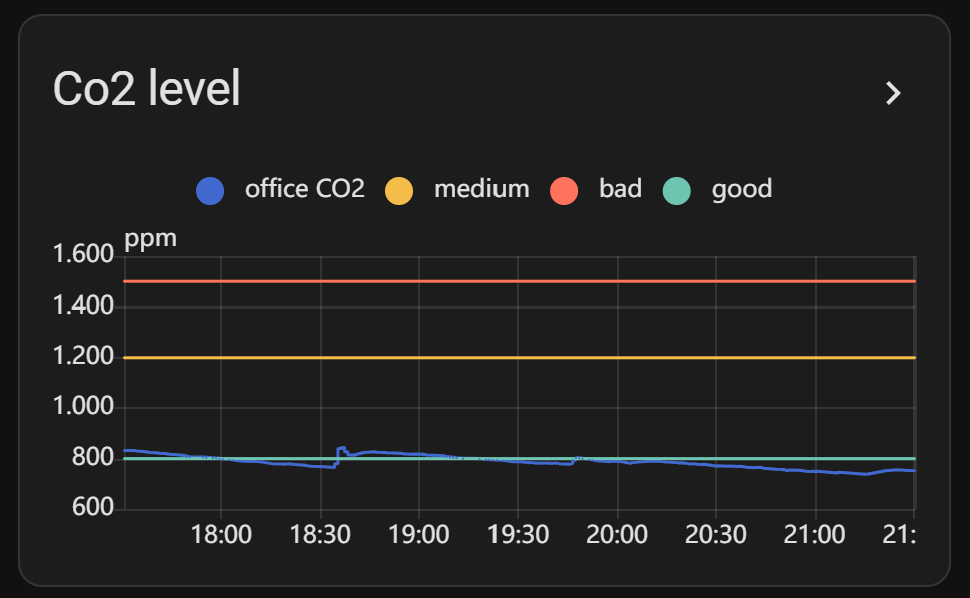
# Sourcecode by vdbrink.github.io
type: history-graph
entities:
- entity: sensor.scd40_co2
- entity: sensor.co2_value_1200
- entity: sensor.co2_value_1500
- entity: sensor.co2_value_800
  logarithmic_scale: false
  hours_to_show: 4
  title: Co2 level
Humidity
For the current room humidity, I used my own DIY ESPHome CO2, temperature, humidity sensor.
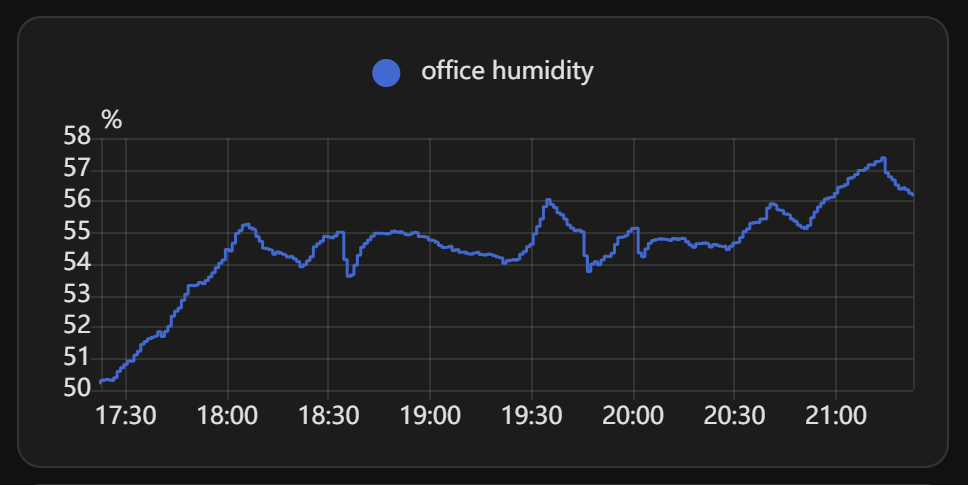
# Sourcecode by vdbrink.github.io
type: history-graph
entities:
    - entity: sensor.espscd40_co2_humidity
hours_to_show: 4
News headline
For the latest news, I used the web scraper to create a sensor based on the news website headline.
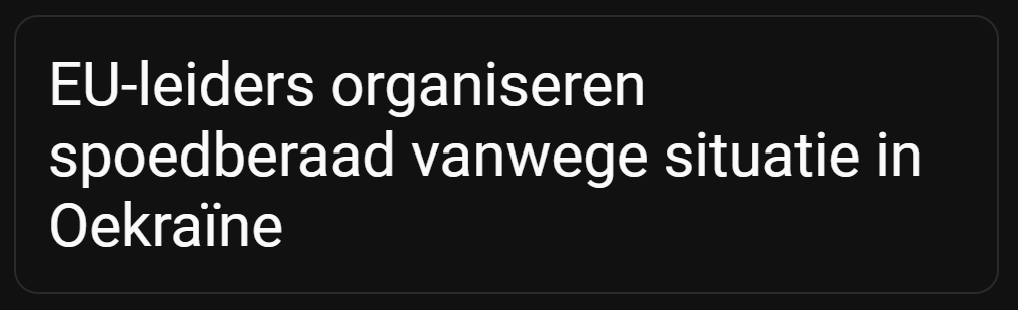
# Sourcecode by vdbrink.github.io
type: markdown
content: |
  {{ states('sensor.web_scrape') }}
card_mod:
  style:
    ha-markdown:
      $: |
        p {
          font-size: 30px;
          line-height: 35px;
        }
Conditional elements
Mushrooms
# Sourcecode by vdbrink.github.io
- type: custom:mushroom-chips-card
    chips:
        - type: conditional
          conditions:
            - entity: sensor.knmi_weercode
              state_not: Code groen
          chip:
            type: template
            icon: mdi:weather-lightning-rainy
            icon_color: |-
              {% if is_state('sensor.knmi_weercode', 'Code groen') %}
                 green
              {% elif is_state('sensor.knmi_weercode', 'Code geel') %}
                 yellow
              {% elif is_state('sensor.knmi_weercode', 'Code rood') %}
                 red
              {% else %}
                 1C1C1C
              {% endif %}
            entity: sensor.knmi_weercode
            content: ""
            tap_action:
              action: url
              url_path: https://www.knmi.nl/nederland-nu/weer/waarschuwingen/zuid-holland
            card_mod: null
          - type: conditional
            conditions:
              - entity: binary_sensor.rain_expected_2
                state: "on"
                content: ""
            chip:
              type: template
              entity: binary_sensor.rain_expected_2
              icon: mdi:weather-pouring
              icon_color: red
              content: ""
          - type: conditional
            conditions:
              - entity: binary_sensor.rain_expected_2
                state: "on"
                content: ""
            chip:
              type: entity
              icon: mdi:clock
              icon_color: blue
              entity: sensor.rain_expected_time
          - type: entity
            entity: sensor.tempest_temperature_feels_like_rounded
            icon: mdi:hand-back-right
            tap_action:
              action: navigate
              navigation_path: /lovelace-diverse/test2
          - type: entity
            entity: sensor.office_chair_occupancy
          - type: conditional
            conditions:
              - entity: switch.blitzsmartplug23
                state: "on"
                content: ""
            chip:
              type: entity
              icon_color: red
              entity: switch.blitzsmartplug23
- type: conditional
  conditions:
    - condition: numeric_state
      entity: sensor.scd40_co2
      above: 800
  card:
    type: entities
    entities:
      - entity: sensor.scd40_co2
    card_mod:
      style: |
        ha-card {
           --ha-card-background:
          {% if states('sensor.scd40_co2') | int > 800 %}
           #ff4500;
          {% elif states('sensor.scd40_co2') | int > 1000 %}
           #ff4500;
          {% elif states('sensor.scd40_co2') | int > 1200 %}
           #ffd700;
          {% else %}
           #008000;
          {% endif %}
          --paper-item-icon-color:black;
          color: black;
          font-size: 25px;
          font-weight: bold;
         }
- type: conditional
  conditions:
    - condition: numeric_state
      entity: sensor.espscd40_co2_temperature
      above: 23
  card:
    type: entities
    entities:
      - entity: sensor.espscd40_co2_temperature
    card_mod:
      style: |
        ha-card {
           --ha-card-background:
          {% if states('sensor.espscd40_co2_temperature') | int > 18 %}
           #ff4500;
          {% elif states('sensor.espscd40_co2_temperature') | int > 23 %}
           #ff4500;
          {% elif states('sensor.espscd40_co2_temperature') | int > 24 %}
           #ffd700;
          {% else %}
           #008000;
          {% endif %}
          --paper-item-icon-color:black;
          color: black;
          font-size: 25px;
          font-weight: bold;
         }
- type: conditional
  conditions:
    - condition: state
      entity: input_boolean.frontdoor_detection_mode
      state: "on"
  card:
    type: custom:webrtc-camera
    url: rtsp://ronald:ggyk4DNSrX4PWJX57FV@192.168.1.174:554//h264Preview_01_main
Temperature too high

The used entity here is based on the KNMI weather alarm scraper.
# Sourcecode by vdbrink.github.io
- type: custom:mushroom-chips-card
    chips:
        - type: conditional
          conditions:
            - entity: sensor.knmi_weercode
              state_not: Code groen
          chip:
            type: template
            icon: mdi:weather-lightning-rainy
            icon_color: |-
              {% if is_state('sensor.knmi_weercode', 'Code groen') %}
                 green
              {% elif is_state('sensor.knmi_weercode', 'Code geel') %}
                 yellow
              {% elif is_state('sensor.knmi_weercode', 'Code rood') %}
                 red
              {% else %}
                 1C1C1C
              {% endif %}
            entity: sensor.knmi_weercode
            content: ""
            tap_action:
              action: url
              url_path: https://www.knmi.nl/nederland-nu/weer/waarschuwingen/zuid-holland
            card_mod: null
          - type: conditional
            conditions:
              - entity: binary_sensor.rain_expected_2
                state: "on"
                content: ""
            chip:
              type: template
              entity: binary_sensor.rain_expected_2
              icon: mdi:weather-pouring
              icon_color: red
              content: ""
          - type: conditional
            conditions:
              - entity: binary_sensor.rain_expected_2
                state: "on"
                content: ""
            chip:
              type: entity
              icon: mdi:clock
              icon_color: blue
              entity: sensor.rain_expected_time
          - type: entity
            entity: sensor.tempest_temperature_feels_like_rounded
            icon: mdi:hand-back-right
            tap_action:
              action: navigate
              navigation_path: /lovelace-diverse/test2
          - type: entity
            entity: sensor.office_chair_occupancy
          - type: conditional
            conditions:
              - entity: switch.blitzsmartplug23
                state: "on"
                content: ""
            chip:
              type: entity
              icon_color: red
              entity: switch.blitzsmartplug23
- type: conditional
  conditions:
    - condition: numeric_state
      entity: sensor.scd40_co2
      above: 800
  card:
    type: entities
    entities:
      - entity: sensor.scd40_co2
    card_mod:
      style: |
        ha-card {
           --ha-card-background:
          {% if states('sensor.scd40_co2') | int > 800 %}
           #ff4500;
          {% elif states('sensor.scd40_co2') | int > 1000 %}
           #ff4500;
          {% elif states('sensor.scd40_co2') | int > 1200 %}
           #ffd700;
          {% else %}
           #008000;
          {% endif %}
          --paper-item-icon-color:black;
          color: black;
          font-size: 25px;
          font-weight: bold;
         }
- type: conditional
  conditions:
    - condition: numeric_state
      entity: sensor.espscd40_co2_temperature
      above: 23
  card:
    type: entities
    entities:
      - entity: sensor.espscd40_co2_temperature
    card_mod:
      style: |
        ha-card {
           --ha-card-background:
          {% if states('sensor.espscd40_co2_temperature') | int > 18 %}
           #ff4500;
          {% elif states('sensor.espscd40_co2_temperature') | int > 23 %}
           #ff4500;
          {% elif states('sensor.espscd40_co2_temperature') | int > 24 %}
           #ffd700;
          {% else %}
           #008000;
          {% endif %}
          --paper-item-icon-color:black;
          color: black;
          font-size: 25px;
          font-weight: bold;
         }
- type: conditional
  conditions:
    - condition: state
      entity: input_boolean.frontdoor_detection_mode
      state: "on"
  card:
    type: custom:webrtc-camera
    url: rtsp://ronald:ggyk4DNSrX4PWJX57FV@192.168.1.174:554//h264Preview_01_main
CO2 too high
# Sourcecode by vdbrink.github.io
Camera stream
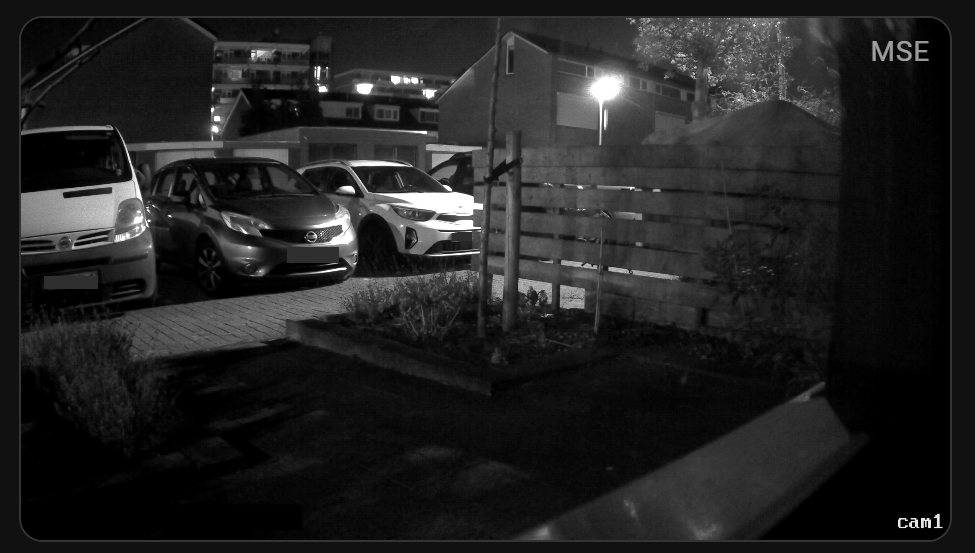
# Sourcecode by vdbrink.github.io
type: conditional
conditions:
  - condition: state
    entity: input_boolean.frontdoor_detection
    state: "on"
card:
  type: custom:webrtc-camera
  url: rtsp://username:password@192.168.1.111:554//h264Preview_01_main
Open doors
# Sourcecode by vdbrink.github.io
Textual weather
# Sourcecode by vdbrink.github.io
Gauge
Two Gauge elements next to each other with the current room- and outside temperatures.
To place them in a horizontal stack, they will be shown smaller.
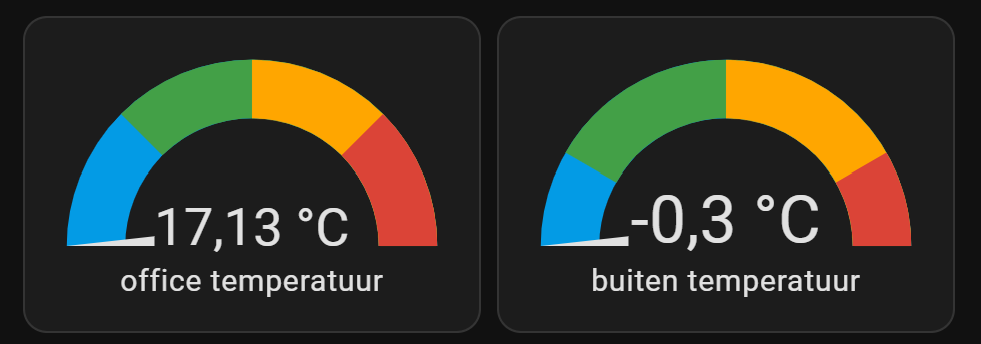
# Sourcecode by vdbrink.github.io
type: vertical-stack
cards:
  - type: horizontal-stack
    cards:
      - type: gauge
        severity:
          green: 21
          yellow: 23
          red: 25
        entity: sensor.espscd40_co2_temperature
        max: 27
        min: 19
        needle: true
        name: office temperatuur
      - type: gauge
        severity:
          green: 21
          yellow: 23
          red: 25
        entity: sensor.tempest_st_temperature
        max: 26
        min: 20
        needle: true
        name: buiten temperatuur
Flexible Horseshoe card
This card needs extended settings.
See the repo page https://github.com/AmoebeLabs/flex-horseshoe-card for all possible details.
See also my other examples of dashboard elements.
I also have a page with more details about how to set up kiosk mode on a tablet.
« See also my other Home Assistant tips and tricks
^^ Top | Homepage | Best Buy Tips | Automation Ideas | Blog posts