Home Assistant: Web Scraper
Here you find how you can scrape (text) elements from a webpage and create a Home Assistant sensor which contains this text. It also works with data from API calls. For each scraper you can define the update time to always get the most actual data.
You can use this data to present on your own dashboard or make automations based on it. Like run the washing machine based on low dynamic energy prices. Show the latest (formula 1) news or show the current weather alarm messages.
This Scrape integration is by default available in Home Assistant.

The official info page: https://www.home-assistant.io/integrations/scrape/
On this page I use, as example, the actual dynamic gas price (from a specific provider) and show this on my dashboard.

REMARK: It’s not always possible to scrape all text, this also depends on the website structure.
Table of Contents
- How it works
- Define the CSS Selector and Index
- Configure the scraper in Home Assistant
- Check your sensor
- Update the sensor
- Add it to your dashboard
- Other examples
How it works
The web scraper integration uses underwater the library Beautiful Soup to read first the whole website and then with the, so-called, CSS Selector it grabs the correct HTML element type (like an A, P, LI, TD or DIV element).
This selector is normally used to style these elements on a pages with CSS.
Then find the corresponding index which contains the element you want to scrape/extract.
In the scrape integration, you can define some extra templating to format and fine-tune the value.
Let’s get started!
Define the CSS Selector and Index
NOTE: Before configuring the Scrape integration in Home Assistant, you need to find first all the required data for it.
The following steps are necessary to take to get the required CSS Selector and Index value for the Scrape integration:
- Get the whole webpage source into an online evaluation page;
- Find the corresponding CSS Selector for your text;
- Strip the unneeded part from the CSS Selector;
- Find the corresponding index.
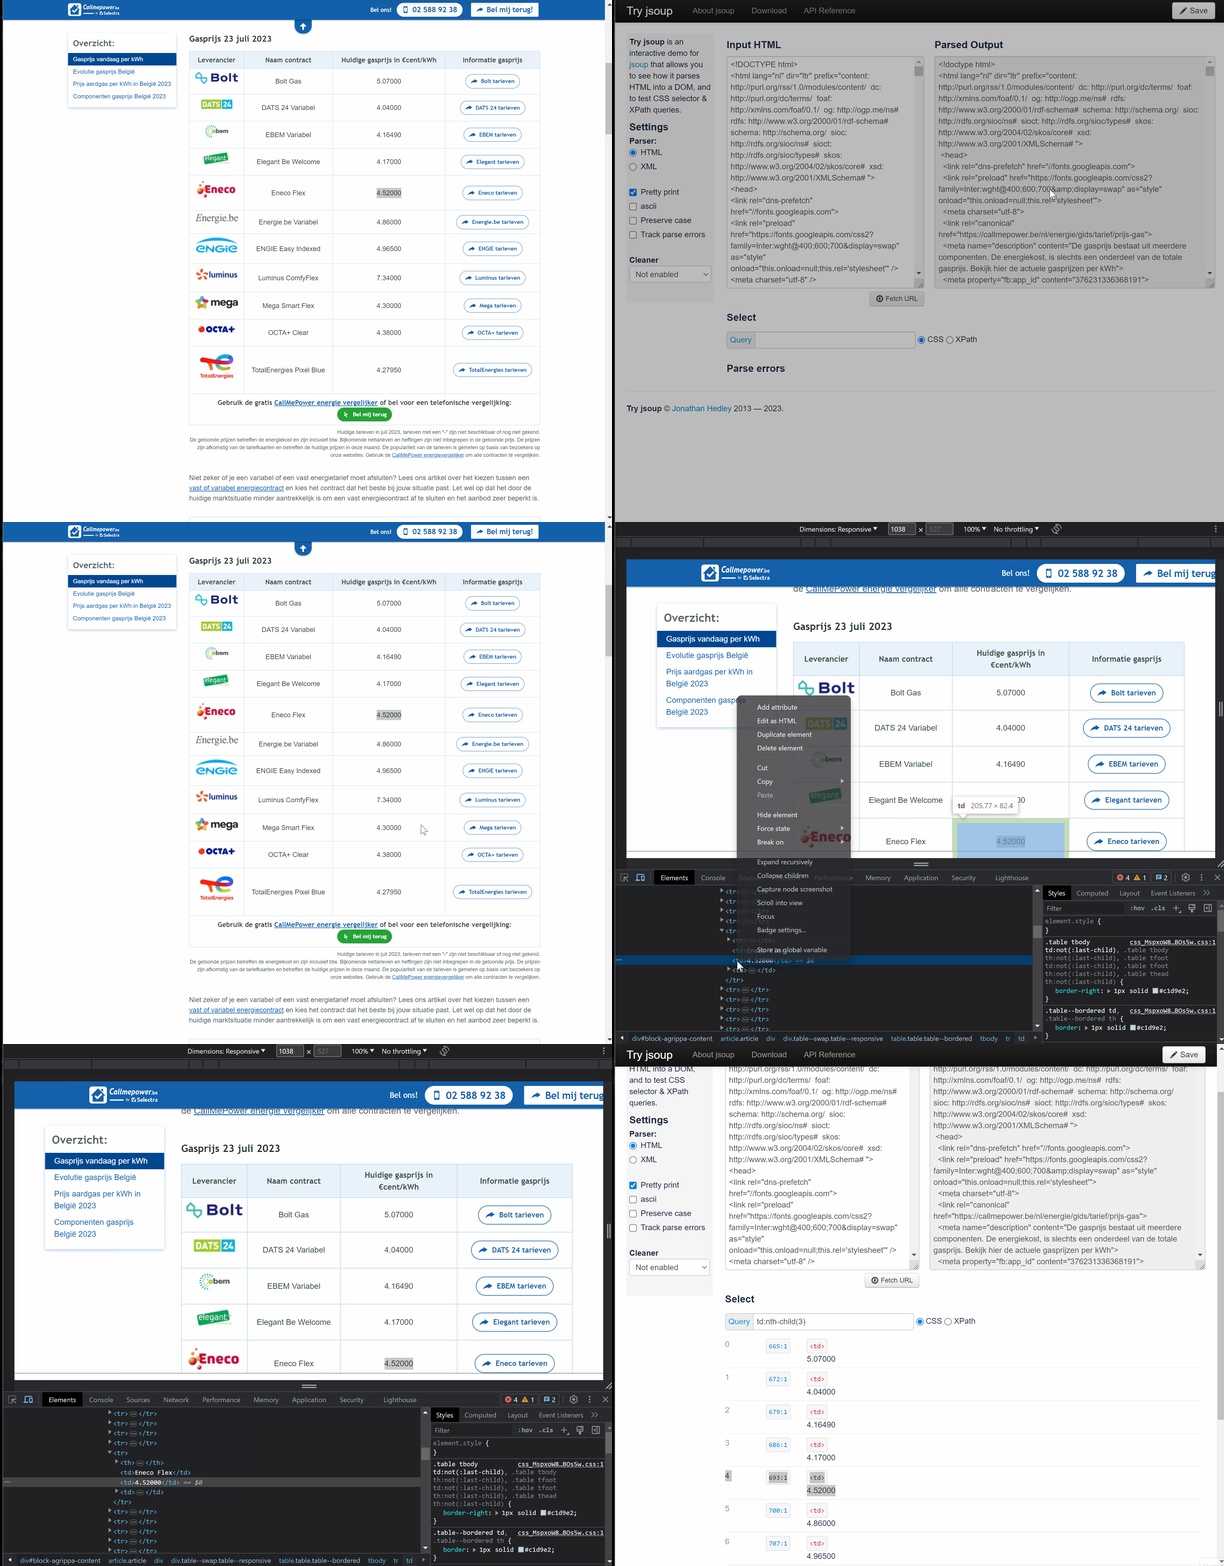
In this animation you see all these steps in action.

The page https://callmepower.be/nl/energie/gids/tarief/prijs-gas is used in this example, and the current gas price from ‘Eneco Flex’ is what we want to scrape.
1. Get the whole webpage source into an online evaluate page
To test if the scraper works in Home Assistant we use the evaluation page try.jsoup.org, this page will help us test the correct CSS Selector and index.
- Go to the page try.jsoup.org
- Click on the button Fetch URL
- Fill in the url https://callmepower.be/nl/energie/gids/tarief/prijs-gas
- Click on the button Fetch. Now the whole page source is loaded
It is possible you get an errors, then try the manual option.
> Click here to see the manual option
- Go with your browser to the website, in this case https://callmepower.be/nl/energie/gids/tarief/prijs-gas
- Right click somewhere and choose to show the Page Source
- With CTRL+A and then CTRL+C select and copy everything
- Go to the page try.jsoup.org
- With CTRL+V paste the clipboard data into the field Input HTML
2. Find the corresponding CSS Selector for your text
- Go back to the original site
- Right-click on the required text to be stored in the sensor
- Select the menu item Inspect. The debug section will open with the page source
- Right-click on the HTML element which contains the required text. In this case
<td>4.520000</td> - Select the menu item Copy > Copy selector (see animation)
3. Strip the unneeded part from the CSS Selector
- Go back to the evaluation jsoup.org page
- Paste the clipboard content into the field Query
- Remove all the data before the last
>In this case the original selector value was#block-agrippa-content > article > div:nth-child(3) > div.table--swap.table--responsive > table > tbody > tr:nth-child(5) > td:nth-child(3), keep onlytd:nth-child(3)
4. Find the corresponding index
- A numbered list that matches all the third columns values from the table as TD HTML elements, is visible.
- The fifth row contains the data. This is index 4 (start counting by 0)
Now all the required input data is available for the scraper. It's time to setup the scraper in Home Assistant.
Configure the scraper in Home Assistant
Use the Home Assistant Scrape integration for this.
Or:
- Go in Home Assistant to the menu items Settings > Devices & Services
- In the bottom right corner, select the Add Integration button
- Type
Scrapeand select the integration - Fill in all the required fields:
- Tab 1
- Tab 2
- Name: Eneco Flex gas price (This will also be used for your sensor name)
- Select: td:nth-child(3) (The CSS Selector)
- Index: 4 (The Index)
- Value Template:
{{ value | float }}(This will also round the price) - Device Class: Balance
- State Class: No state class
- Unit of Measurement: €cent/kWh
- Submit to finish the configuration
Congratulations! A new web scrape sensor is created!
It’s unnecessary to refresh or restart anything, the sensor is directly available.
Check your sensor
Hopefully everything went well. Let’s check the result!
- Go in Home Assistant to the menu item Developers Tools
- Go to the State tab
- Filter on
eneco_flex_gas_price
Now the just created scrape sensor is available, and looks like this:

Update the sensor
If you’re not totally happy with the extracted result:
- Go to Settings > Devices & Services
- Click on the wheel in the Scrape integration
- Click on Configure behind the url
- Click on Configure sensor
- Make your changes and submit
Add it to your dashboard
Now the new sensor can be added to the dashboard or can be used in an automation.

With a Markdown card, it’s possible to only show the extracted data, for example, if you scrape a news site headline.

This is the corresponding YAML code:
# Sourcecode by vdbrink.github.io
# Dashboard card code
type: markdown
content: |
  {{ states('sensor.nu_nl_headline') }} [>>](http://nu.nl)
Other examples
Just some other pages and settings with data that can be scraped. It can be used for news, weather, prices, etc.
| Site | URL | Selector | Index |
|---|---|---|---|
| Latest formula 1 news | https://www.f1news.nl/ | div.uplp-post-title |
0 |
| KNMI Dutch weather alarm | https://www.knmi.nl/nederland-nu/weer/waarschuwingen/overijssel | div.alert__heading and a.alert__description |
0 |
| nu.nl news headline | https://www.nu.nl | h1.title.fluid |
0 |
Happy scraping!
Let me know if you have some usefull scraped data!
NOTE: In the old YAML Scrape integration you can set a
scan_intervalhow often you want to scrape the site. I don’t see this variable in the graphical version. Do you know how to set this? Please let me know!
<< See also my other Home Assistant tips and tricks
